 | |||
 |  |  |
 |  |
 |  | ||
 |  | ||
 |  | ||
for Big Indoor TrainsTM |
|
|
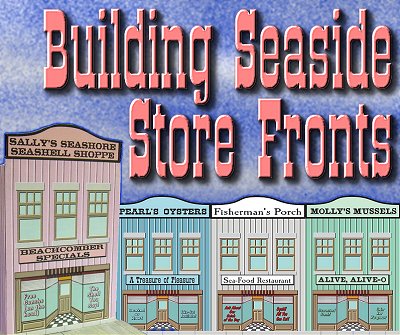
Note from Editor: This project is another in our Tribute to Tinplate(tm)" series, a tribute to the tinplate villages and trains that surrounded so many Christmas trees in the early 1900s. It also makes a good supplement to our Sandy Shores beach putz projects. If you want to set up a seaside village there are enough projects on this page and the Sandy Shores page to make a nice mantel-wide collection.
Like the original Building Tinplate Storefronts project, this project was inspired by a series of candy containers that were made in the early-to-mid 1900s by West Brothers. Each container included a glass full of candy that you could see through the house's "windows." A photo of the one of the original tins is at the left. If you sign up for our Trains-N-Towns(tm) newsletter, we'll let you now when we create and upload more storefronts or other projects you might find helpful. New for 2013! Daffy's Taffy Store - We've added another building for our loyal readers and builders. Surprise: It looks a lot like the other buildings. :-) but it will give you an excuse to make your seashore village a bit bigger. And don't forget that we have more buildings, as well as accessory projects you can use to "spruce up" your village on our Sandy Shores page. Building Seaside Store Fronts - from Big Indoor Trains(tm)After Paul and I started creating our first Tribute to Tinplate(tm)" buildings, we both started combing the Internet for photographs of worthwhile projects. Once we got started with storefronts based on the West Brothers' candy boxes, it wasn't hard for Paul to keep imagining new versions. Paul envisions these buildings as a relatively simple addition to our Sandy Shores beachfront-style structures and accessories. Or they might suit the needs of a person who likes to keep the same tinplate-style village set up year-round but likes the idea of seasonal adjustments.The only real difference between building these houses and our original Tinplate Storefronts is in the base. Instead of a a sidewalk/curb appearance, I've used popsicle sticks and sand to provide a boardwalk appearance. What You Will Need
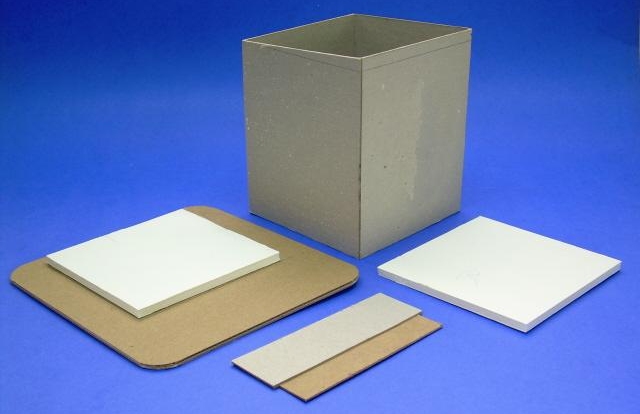
A Note about ScaleAlthough my Marx trains run on O gauge tracks, they are closer to S scale (1:64), the scale of S gauge American Flyer trains, and many collectible village houses. So I chose that scale to build these projects.What if You Need Something Bigger? - If you're running larger scales, such as true O scale, Large Scale (garden trains), or the old-fashioned Standard Gauge tinplate trains, you will need to contact Paul for 1:48 or larger versions (1:37 is the the largest that these buildings can be printed out on most printers). Or you might be able to get a copy center to print the S-scale graphics at 1.33X or 2X on a large format printer (for 1:48 or 1:32 respectively) - the resolution of the graphics should be high enough to support that. But those files are just too big to host permanently unless folks start donating more toward Paul's Hard Disk Space fund. :-) If you want to be certain your project will look right with your existing equipment, consider doing a "mockup" first. Print out a copy of Paul's graphics in black and white (saving your color cartridges). Then cut and fold the printout to make a mockup you can set next to your trains and other accessories before you begin the final structure. Print the PatternsThis project has a structure pattern that you will need to cut out and transfer to cardboard, as well as graphic sheets that you will use to finish the building's appearance.Note: For this project, we have provided the patterns in S scale, the scale we used for this project. The plans include the size for O scale as well. If you need other sizes, please contact Paul. You may print the structure pattern on any sort of paper, since you're simply using this to transfer the plan to your cardboard medium. However the "lithograph" graphic should be printed on acid-free heavy paper or card stock. Note that Plans 1a and 1b are meant to be spliced together before you transfer the pattern to the cardboard. For Optimum Printing - For the lithographic "wrap," we have used professional "vector" graphics when possible, to make certain that you get the highest resolution graphic, whatever scale you use. In most cases, you can get the best result by right-clicking on the name of the graphic you need, then saving the pdf file to your hard drive. (That way if you accidentally print them at the wrong size, which is very easy to do on some printers, you don't have to download them again.) Then navigate to the folder where you saved the files and click on the file name. Adobe Acrobat Reader should open up. Make certain that the graphic is set to print at 100% ("scale to fit" or "fit to page" should not be checked). Structure Patterns
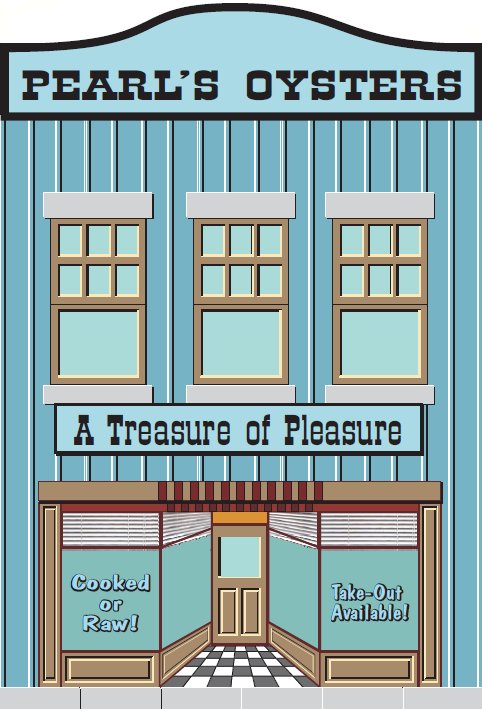
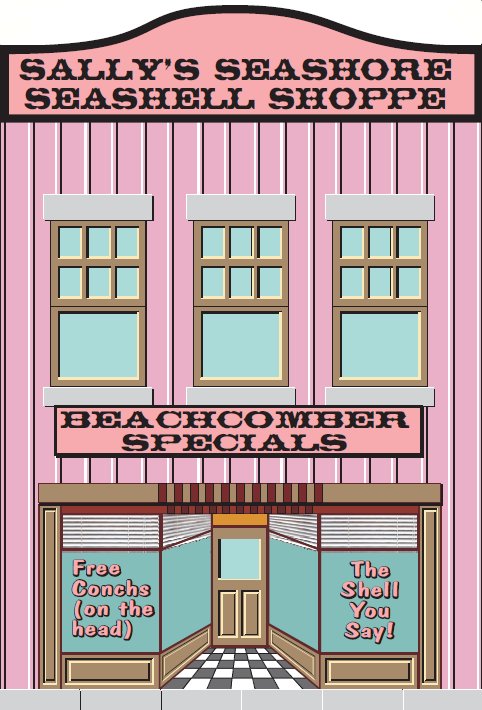
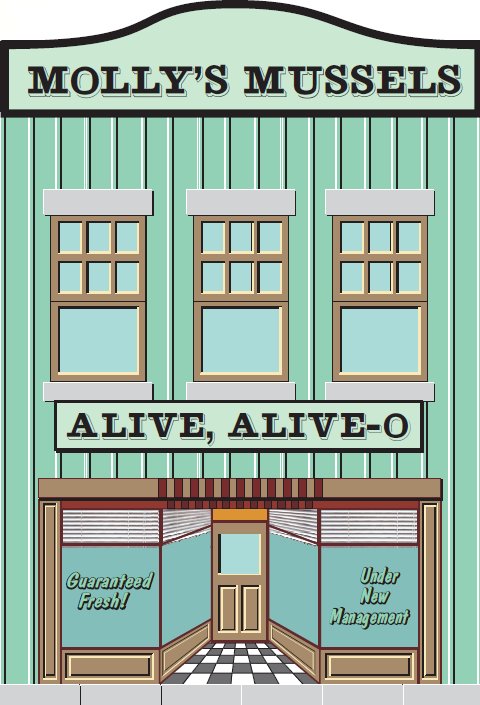
Store Front GraphicsTo help you decide which pieces to start with, I've supplied medium-resolution jpeg versions of the building faces. If you click on the little thumbnail, you'll see a version big enough to see clearly. However for the actually project, please download and print the pdf versions from the text boxes below the thumbnails.
Tar Paper/Flat RoofThese patterns are from another feature, so you'll have to trim them to size after you download them. Though I like the staggered pattern best, I did one of each of these, just for variety. Which one or ones you use is entirely up to you. It was common on structures like this to change up even the insignificant patterns when redrawing the graphics, so don't worry too much about consistency.
If you can't get the graphics to work the way you need them to, contact
Paul and ask him for help - that's his department. :-)
A note about Copyright - However you use these plans and graphics for your personal use, please keep in mind that the lithograph graphics are copyright 2010 by Paul Race and are not to be copied, re-used, republished, or repurposed without prior permission and appropriate credit. Commercial use without prior permission is illegal and expressly forbidden.
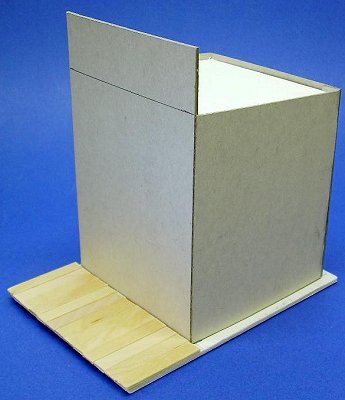
Building a "Mockup"You will save time and sanity in the long run if you print the graphics in low-res B&W first to make certain that the are the right size for the plans you have printed out and that they are the right size to go with the rest of your equipment.First, make certain that the plans you have printed are the same size as the graphics you have printed. Sadly, it is very easy to download all the right graphics, then click the wrong button (such as "fit to page") when you go to print. Worse yet, a few printer drivers make all of those decisions for you unless you click on the "advanced" button or some such. As silly as this step may sound, use cheap paper to print the plans, then print the graphics in draft mode in black and white (to save toner cartridges). You can try holding both sheets up to the light, but sometimes it's hard to get a complete "picture." Remember, when you score and fold the frame pieces, the actual structure should be a bit wider in each direction than the pieces you cut out, because you need to compensate for the thickness of the cardboard you are using. Paul's wall graphics extend the wall pattern beyond the fold lines to compensate for any minor differences, but don't count on that compensating for any major discrepancies. The best way to be sure you have plans in the same scale as your graphics is to fold the graphics along the fold lines, then cut them out and hold up to the frame pieces. Again, the frame should be slightly smaller, especially horizontally. If it isn't you should adjust the size when you transfer the plans to the card stock. Mismatched sizes between graphic and plans is a problem that is much easier to head off than it is to solve once you've cut out the building frame. Cutting and Scoring the Frame Pieces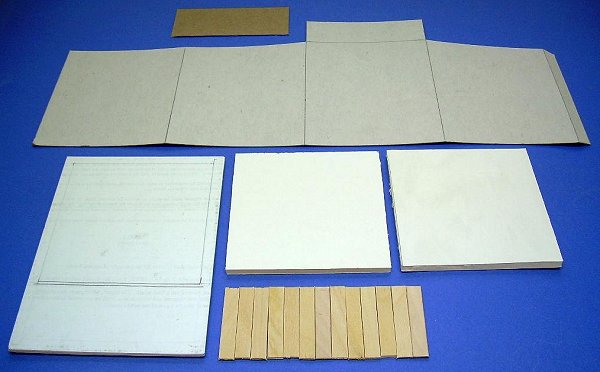 Once you are confident your frame pieces are the right size, use a Xacto-type knife and a straight edge to carefully score every place where a fold is indicated. Then cut the pieces out and fold them into a square. Once you are confident your frame pieces are the right size, use a Xacto-type knife and a straight edge to carefully score every place where a fold is indicated. Then cut the pieces out and fold them into a square.
Now it's time to temporarily fold the B&W graphics around the walls as a "sanity" check. If it helps you to actually put one together this way, go for it. Engineers have a saying "build one to throw away, you will anyhow."
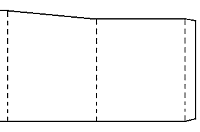
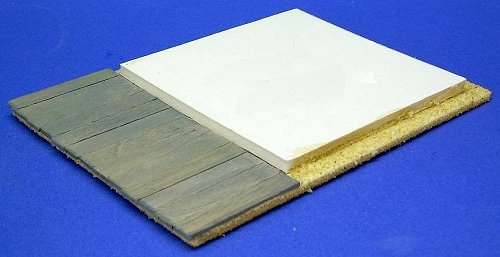
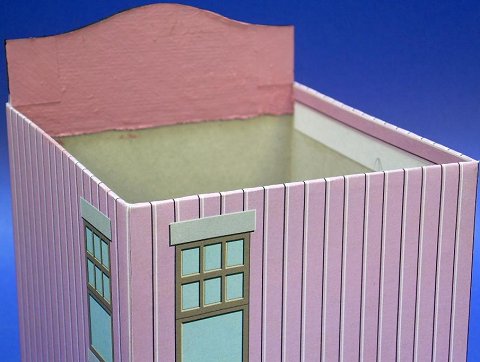
Building the BaseIt was my idea to make the "sidewalk" in front of the building into a "boardwalk." This will eventually give you a very nice place to set figures, fire hydrants, lamp posts, and the like.I made the base by laminating two pieces of the thin corrugated cardboard from Express Mail packages. You could laminate "matte" cardboard as well. The foundation should fit loosely inside the four sides of the building once it is assembled. Eventually, it will give you more surface for gluing the building down to the base reliably. That said, you don't want to glue the foundation to anything until the building is To create the boardwalk, I cut several popsicle sticks into two-inch lengths. Then I checked the fit of the building on the foundation. When I was sure of the fit, I glued the foundation and popsicle sticks down. I stained the popsicle sticks with watered down gray and driftwood color acrylic paint. I painted the base with tan (sand-colored) paint; then I glued on the popsicle sticks. Finally I glued sand over the part of the base that was still exposed. Work a little at a time, spreading white craft glue (like Elmer's), and tamping the sand into the glue. Building the Crest and Support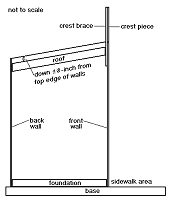 Technically, I could have made each storefront from one big piece of cardboard, including room for the "crest." As it turned out, it was easier for me to build the crest separately and fasten it on to the building front after I had the four walls glued together. I also added an extra layer of support to the crest, since it would be sticking out and more prone to "bumping." Plan 3 shows a side view of how I layered these pieces. Technically, I could have made each storefront from one big piece of cardboard, including room for the "crest." As it turned out, it was easier for me to build the crest separately and fasten it on to the building front after I had the four walls glued together. I also added an extra layer of support to the crest, since it would be sticking out and more prone to "bumping." Plan 3 shows a side view of how I layered these pieces.
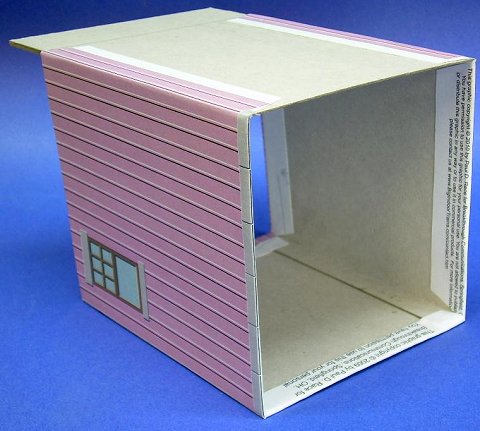
By making three of these at the same time, I could work on one while the other one was drying, and so on. Let the building frames dry at least overnight before you start applying the graphics - the last thing you need is a joint popping or the frame getting wobbly while you're trying to be precise with the graphic. Applying the GraphicsThen I carefully applied the graphic wraps to one wall at a time. I started on the sides, then did the back and front. I could have started with the backs just as easily, but the front definitely has to come last.
Spread a thin layer of glue over the entire wall to be glued, and along the edges where the extra bits will wrap around the corner. Then fasten the graphic down carefully. Consider using clothespins or the like to make certain the wrap doesn't shift during the drying process. Once the first "wall" has dried, you add the next wall, except that one of your "fold lines" on the next wall should actually be a "cut line" if your graphic pages are fitting where they need to be.
Because I didn't cut the crest's shape out, the building's crest looks a little funny at first. I could have cut it out ahead of time, I suppose, but then I'd have an extra variable while trying to align the graphic for the store front with the left and right edge. Or worse yet, I'd discover that I had cut the crest shape wrong and have to start a building all over again. Trimming the CrestWhen the glue for the front has dried completely (meaning overnight at least), use a very sharp Xacto-style knife to trim the crest to match the shape of the graphic. Don't rush this job or try to cut all the way through both layers of cardboard on the first pass. Instead, make many light passes.
Applying the RoofOnce you have the structure glued together and all graphics applied, cut out a piece of corrugated cardboard or foam core to fit just inside the walls. Choose and apply a roofing pattern, and when it is completely dry, fasten it in place. I fastened mine about an 1/8" down from the side and back walls. I actually applied the glue from inside the building, then brushed it into the seams where the roof fit the walls.Touch Up the Cut LinesWhen all the graphics are applied, take a marker or fine-tipped brush and touch up the edges of the cut graphic media with a color that is compatible with the siding color.
Once you have tested all of the fits, it's time to glue your structure(s) together. Double-check the fit of the foundation inside each building, then glue it onto the base. I'd give it a few minutes to set before gluing the building down on top of it. Again, the hurry-up-and-wait aspect of this stage of the project is reduced if you are working on two or three buildings at once.
|


|
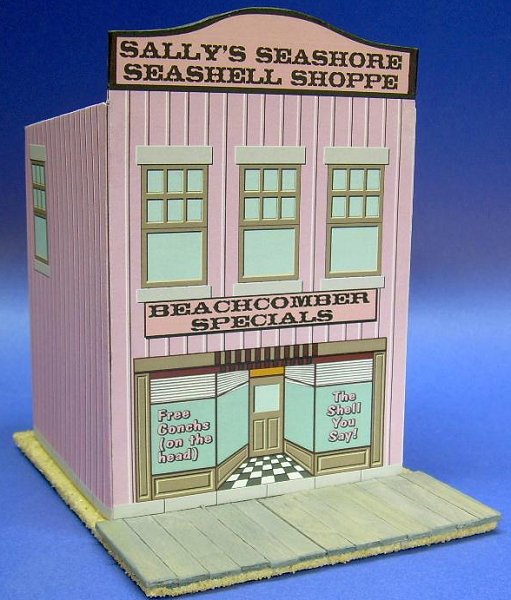
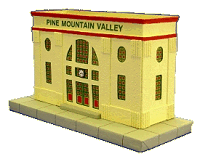
 To create the lithographic-style graphics, I worked from photographs of the originals as much as possible to reproduce the architectural details and the fake 3-D entrances. However, I increased the size of the buildings, to look right with our trains and villages. I also added extra details to keep the buildings from looking too plain at the larger sizes.


 Building TinPlate-Syle Store Fronts
 Building a Vintage "Lithograph" Station
 Building a Tinplate-Inspired Lamp Post
 Building a Tinplate-Inspired Watchman's Shanty
 Building a Tinplate-Inspired Railroad Crossing Sign


 Building the Union Station


|

|  |
 |
 |  |  |
Note: Big Indoor Trains(tm), Big Train Store(tm), Family Garden Trains(tm), Big Christmas Trains(tm), Garden Train Store(tm), and Trains and Towns(tm) are trademarks of Breakthrough Communications (www.btcomm.com). All information, data, text, and illustrations on this web site are Copyright (c) 1999, 2000, 2001, 2002, 2003, 2004, 2005, 2006, 2007, 2008, 2009, 2010 by Paul D. Race. Reuse or republication without prior written permission is specifically forbidden.
Big Indoor Trains(tm) is a participant in the Amazon Services LLC Associates Program, an affiliate advertising program designed to provide a means for sites to earn advertising fees by advertising and linking to amazon.com.
For more information, contact us.