|
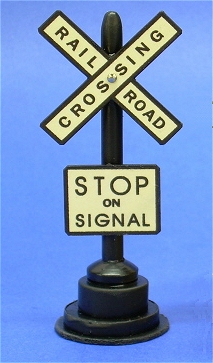
Note from Editor: In early 2009, Christmas Village project designer Howard Lamey and I began working together to bring the look of the very old tinplate trains and towns into modern-day homes. For this Tribute to Tinplate(tm) series, I've been providing graphics that were inspired by the tinplated-steel buildings and accessories of a century ago, and Howard's been providing the "how-to" hands-on  instructions and detail plans for completing the project. Soon it became obvious that authentic period accessories would be necessary to cinch the overall look of the tinplate era. This "crossbuck" was inspired largely by a Marx accessory designed to work with Marx tinplate O gauge trains. Like most accessories made for those trains, this is a tad oversized, but that contributes to the authentic look. For your convenience, we have also provided the plans and graphics in smaller and larger scales. Betcha can't build one. (Just one, that is!) instructions and detail plans for completing the project. Soon it became obvious that authentic period accessories would be necessary to cinch the overall look of the tinplate era. This "crossbuck" was inspired largely by a Marx accessory designed to work with Marx tinplate O gauge trains. Like most accessories made for those trains, this is a tad oversized, but that contributes to the authentic look. For your convenience, we have also provided the plans and graphics in smaller and larger scales. Betcha can't build one. (Just one, that is!)
A Note About Accessory Size
Very few tinplate trains were built in anything like a specific scale. Generally, trains were between 75% and 50% of the size they really "should have been" based on the width of the track they ran on. Ironically, many accessories were larger than they "should have been." We have chosen to scale this accessory so that it looks right with the Watchman's Shanty project and will look "right" with most O gauge/O27 trains. However, we have provided resources and guidelines for building this project in smaller and larger sizes.
Building a Tinplate-Inspired Railroad Crossing Sign
For me this project started when Paul first sent the "GIF" version of the graphic to me. I cut and pasted it into MS Word(r) and kept resizing and reprinting it until I got the size I thought would look right with our watchman's shanty project.
 The photo to the right shows a "mockup" I made while trying different sizes of graphics. When Paul saw this photo, he agreed with me that the outlines needed to be thicker to really give the "tinplate" look. I also decided that the base needed a fatter look. But that's what mockups are for. The photo to the right shows a "mockup" I made while trying different sizes of graphics. When Paul saw this photo, he agreed with me that the outlines needed to be thicker to really give the "tinplate" look. I also decided that the base needed a fatter look. But that's what mockups are for.
I then sent Paul the measurements I wanted to use for my final project, and he based his .pdf versions below on those measurements. The "O Scale/O27" measurements are taken from the version I used. Hopefully you'll have it a little easier, since we've already done the resizing for you.
Materials Needed:
- Clean, solid cardboard, like the kind from the back of a legal pad (You could use tin if you really wanted to, I suppose)
- Acid-free white card stock or bond paper for printing the graphic
- A white glue or glue stick for gluing the graphic to the cardboard
- Black acrylic paint for the edges and back of the sign and for the post. Flat black is fine, since you're going to use a glossy acrylic coat to make the whole thing shiny eventually
- A very fine paint brush for the edges of the signs
- A craft brush for painting the back of the signs and the post
- A dowel in the right diameter for your project's post. For my "O-gauge tinplate" version I used a candy apple stick. That would work for the S scale version as well, but for the Standard Gauge version, you'll need something wider, like a Bic pen cylinder.
- A faucet washer for "trim"- may not work for the Large Scale/Standard Gauge version, depending on what you use for a dowel.
- For the "fat part" of the base, you can use a sliced-up broom handle or the plug from using a hole saw. Or you may use all or part of a 35mm film canister (remember those? Those are the things Paul uses to keep his guitar picks in). In fact, Paul recommends a film canister for the Large Scale/Standard Gauge version. But if you use a film canister, weigh it down with plaster, glued-in gravel, or something before you glue on the wider base - otherwise it will be very top-heavy.
- A can of glossy clear acrylic finish (indoor-outdoor is best)
Downloading the Signs and Graphics
| Note: If you want to download hi-res images and resize them yourself in MS Word or a similar program, you may click on either of the images to the right. For best results, we recommend that you try the presized .pdf files below first. |
 |
 |
| O27/O gauge tinplate version, as shown in photos |
Click to download the O Gauge graphic (shown in title photo) |
Click to download the O Gauge plans, for use with O27 and O gauge tinplate trains |
| S scale versionslightly smaller, for Christmas villages and On30 or American Flyer S gauge trains |
Click to download the S Scale graphic. |
Click to download the S Scale plans. |
| Large Scale/Standard Gauge version for Large Scale (garden) trains and Standard Gauge tinplate trains (like very early Ives and Lionel) |
Click to download the Large Scale/Standard Gauge graphic. |
Click to download the Large Scale/Standard Gauge plans. |
Chances are you need the O27/O gauge version shown in the photographs. Click on the two links in the darker boxes to get the graphic and the plans you need. For your mockup, print both files on cheap paper, but eventually you'll want to have the graphic on acid free card stock or bond paper.
You can easily cut out the graphic that's already "assembled," tape it onto a Bic pen or something and hold it near the pieces you want to use it with to decide if that's the size you want. Remember, oversized is authentic for this sort of accessory.
If you decide that you really need another size altogether, you can access a high-resolution gif file by clicking on the graphic in the box above. It will seem huge when you open it, but that's because it's made to print nice on a 200-300dpi printer, not to look nice on a 72dpi screen. Copy the .gif file into MS word or a similar program, and resize it to your heart's content.
Finally, once you get a sense for how you're going to complete this project, you may reconsider how many of these you want to make. Since a certain amount of time is taken up waiting for glue or paint to dry, you may decide it's as easy to do four as to do one. but that's up to you, in part depending on the materials you have at hand.
Making the Signs
Careful attention to detail during this phase will go a long way toward creating the authentic look of a real antique sign.
- Use the "unassembled" crossbuck "boards" from your cheap paper version of the graphic to get the exact size of the signs. Cut the signs from heavy, solid cardboard with an Xacto knife.
- Print the graphic on acid-free card stock or white bond paper. Cut it out carefully.
- Glue the graphic very solidly to the sign using white glue or a glue stick.
- When the glue is dry, nibble each corner off a bit, with a Xacto knife (or maybe a fingernail clipper). Go conservatively, since you'll eventually want all 8 corners of the "crossbuck" part of the sign to look the same, and you'll want all 4 corners of the "stop" sign to look the same.
- Using a very fine brush, touch up the edges of the paper where it was cut and the edge of the cardboard.
- When that is dry, paint the back of the signs black.
- Pierce the two "boards" of the crossbuck where they will need to have holes to attach to the post. The hard part of this is doing it without bending the "boards" or putting an obvious depression in them.
Assembling the Post
For the "fattest part" part of the post, I cut a stack of cardboard disks to the diameter I wanted, then I wrapped a very thin piece of cardboard around them to camouflage the edges. I also used a wider circle of solid cardboard at the very base. This gives better support and provides the "flange" look of the original.
The steps you take in final assembly of the base will depend on what materials you selected.
- Predrill the Base - Depending on what you used for the "fat part" of the base, you may have to drill a hole for the dowel to fit in. I also glued a slightly larger circle on the very bottom to give it the "flange" appearance of the original toys (if your sign is really top-heavy you can increase the diameter of that circle).
- Predrill the post - When you've decided where you want the crossbuck signs to attach, you may want to pre-drill a tiny hole for the pin. It's possible to do that a speed drill and the smallest diameter nail you can find. Of course the looser the fit of the final straight pin, the more you'll have to depend on glue to keep the thing together.
- Cut the straight pin to be long enough to into the post but too short to come out the other side. Don't put it in yet.
- Glue the post together - keep an eye on it while it's drying to make sure nothing slips out of place.
- Paint the post black all over.
- When all of the paint is dry, glue on the signs.
- When that glue is very dry (overnight is best), give several light coats of the clear, glossy acrylic finish. Give time between coats to dry to touch, so you don't get drips or streaks.
Conclusion
Of course once you make one of these, you might feel the need to make another five or six. We are definitely interested in seeing how these projects look on your railroad or display village. Please contact
us for information about how to send digital photos.
For many more sign ideas, you might want to check out the Big Indoor Trains Resources page. That page includes links to many free, downloadable business, station, and street signs that you can download, rescale if necessary, and use to add interest to your railroad and downtown settings.
Also, if you have a project idea that you would like us to consider, please use let us know.
Finally, now that I'm in "retirement," this hobby has become a sort of avocation for me. Several folks have commissioned me to build specific houses for them. So if you'd like me to "bid" on a cardboard house for you, or if you have any questions at all, please use the e-mail address on my order page to contact me directly.
If you liked this project, you may also like:
 Building a Vintage "Lithograph" Station
Our first "Tribute to Tinplate" article pays tribute to the lithographed stations of a century ago. Free downloadable commercial-grade graphics and instructions are available in several scales. Instructions for building this project inexpensively from scrap cardboard are also included, although you could build it from tin if you really wanted to. Building a Vintage "Lithograph" Station
Our first "Tribute to Tinplate" article pays tribute to the lithographed stations of a century ago. Free downloadable commercial-grade graphics and instructions are available in several scales. Instructions for building this project inexpensively from scrap cardboard are also included, although you could build it from tin if you really wanted to.
 New
Feature - Building a Tinplate-Inspired Lamp Post The ideal accessory for the Lewis Park Station, or any station or city hall on your railroad or holiday village. No, they don't actually light, but they are cheap and easy to build and add a great deal of vintage interest to any setting. Free downloadable plans are available in several scales. New
Feature - Building a Tinplate-Inspired Lamp Post The ideal accessory for the Lewis Park Station, or any station or city hall on your railroad or holiday village. No, they don't actually light, but they are cheap and easy to build and add a great deal of vintage interest to any setting. Free downloadable plans are available in several scales.
 New
Feature - Building a Tinplate-Inspired Watchman's Shanty Back in the day before automated crossings, these were common sites alongside busy rail crossings. Howard's exclusive design pays tribute to a series of tinplate structures that go back a hundred years and include three different scales. His free plans and instructions will help you dress up any indoor railroad or holiday village. New
Feature - Building a Tinplate-Inspired Watchman's Shanty Back in the day before automated crossings, these were common sites alongside busy rail crossings. Howard's exclusive design pays tribute to a series of tinplate structures that go back a hundred years and include three different scales. His free plans and instructions will help you dress up any indoor railroad or holiday village.
More Structure Projects for Indoor Trains and Towns include:
To Return to the BIG Indoor TrainsTM Primer Page, click here.
|


|