|
Note from Editor: Howard Lamey came up with this project while we were still working on our first Tribute to Tinplate(tm) article - the Lewis Park station. We have since realized that authentic-looking period accessories help "cinch" the overall look of the tinplate era. This "lamp post" doesn't actually light but it summons a whole lighthouse worth of memories for folks who grew up with tinplate trains. )
Building a Tinplate-Inspired "Street Lamp"
While Paul and I were still hashing out the details of his "Lewis Park" tinplate station project, I decided the project needed a little something extra. So I looked at old photos of street lights made by companies like Lionel in the pre-WWII era and decided to put together a few for my station setting. These don't actually light - sorry, but they certainly add to the look.
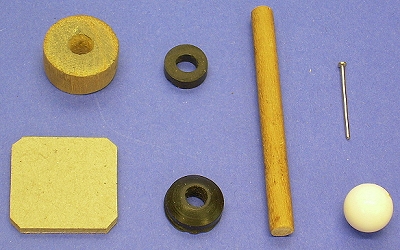
Materials Needed:
The following list contains suggestions only - you may have something onhand already that suits your purposes better.
 A white glue A white glue
- Black acrylic paint
- A craft brush
- A dowel in the right diameter for your project's post. For my "O-gauge tinplate" version I used a candy apple stick. That would work for the S scale version as well, but for a larger version, you may want something wider, like a Bic pen shaft.
- A faucet washer and spacer washer for "trim"
- For the "fat part" of the base, you can use a sliced-up broom handle or the plug from using a hole saw. For a larger version, you may use all or part of a 35mm film canister. But If you use a film canister, weight it down with plaster, glued-in gravel, or something before you glue on the wider base - otherwise it will be very top-heavy.
- A can of glossy clear acrylic finish (indoor-outdoor is best)
- A plastic white or "pearl" bead from toy jewelry
- A straight pin
- I built up several layers of thick, noncorrugated cardboard like you get from the back of a writing tablet. A small square of Masonite-type material or thin plywood would work as well. If you use foam core board, you can't use spray-on varnish finish when you're done - it eats the foam.
Chances are you have most, but not all of the things you need right now - if you take a little time to think, you can probably scrounge something that will replace the other supplies without leaving the house.
 Downloading the Plan Downloading the Plan
The plan for this task is really just to show you one way to put the pieces together. How your final project looks, or what size it is really depends on what materials you wind up using, and your personal preferences. But if you want to download the plan for your sanity's sake, simply click on the graphic to the right to see a plan in the scale used in the photographs.
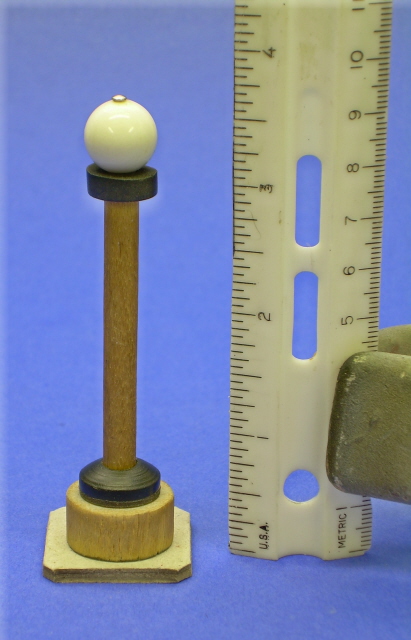
Assembling the Lamp Post
For the "fattest part" part of the post, I cut a stack of cardboard disks to the diameter I wanted, then I wrapped a very thin piece of cardboard around them to camouflauge the edges. I also used a wider circle of solid cardboard at the very base. This gives better support and provides the "flange" look of the original.
The steps you take in final assembly of the base will depend on what materials you selected.
 Predrill the base - Depending on what you used for the "fat part" of the base, you may have to drill a hole for the dowel to fit in. You don't want to straight pin to wobble around. Predrill the base - Depending on what you used for the "fat part" of the base, you may have to drill a hole for the dowel to fit in. You don't want to straight pin to wobble around.
- Predrill the post tip - Depending on how hard your dowel material is, you may need to pre-drill a hole for the straight pin to get started in. It's possible to do that a speed drill and the smallest diameter nail you can find - don't go more than 1/4", though.
- Glue the post together - keep an eye on it while it's drying to make sure nothing slips out of place.
- Paint the post all over. Black or dark green are the most typical colors for this sort of lamp. Lionel sometimes used silver as well.
- When that glue is very dry (overnight is best), give several light coats of the clear, glossy acrylic finish. Give time between coats to dry to touch, so you don't get drips or streaks.
- Stick the bead and straight pin on and glue in place.
Conclusion
Of course once you make one of these, you might feel the need to make another five or six. We are definitely interested in seeing how these projects look on your railroad or display village. Please contact
us for information about how to send digital photos.

For many more sign ideas, you might want to check out the Big Indoor Trains Resources page. That page includes links to many free, downloadable business, station, and street signs that you can download, rescale if necessary, and use to add interest to your railroad and downtown settings.
Also, if you have a project idea that you would like us to consider, please use let us know let us know.
Finally, now that I'm in "retirement," this hobby has become a sort of avocation for me. Several folks have commissioned me to build specific houses for them. So if you'd like me to "bid" on a cardboard house for you, or if you have any questions at all, please use the e-mail address on my order page to contact me directly.
Return to Tribute to Tinplate(tm)
If you liked this project, you may also like:
 Building a Vintage "Lithographed" station - Our first Tribute to Tinplate(tm) project. Free downloadable commercial-grade graphics and instructions will help you add a vintage look to any indoor railroad. Building a Vintage "Lithographed" station - Our first Tribute to Tinplate(tm) project. Free downloadable commercial-grade graphics and instructions will help you add a vintage look to any indoor railroad.
 New
Feature - Building a Tinplate-Inspired Watchman's Shanty Back in the day before automated crossings, these were common sites alongside busy rail crossings. Howard's exclusive design pays tribute to a series of tinplate structures that go back a hundred years and include three different scales. His free plans and instructions will help you dress up any indoor railroad or holiday village. New
Feature - Building a Tinplate-Inspired Watchman's Shanty Back in the day before automated crossings, these were common sites alongside busy rail crossings. Howard's exclusive design pays tribute to a series of tinplate structures that go back a hundred years and include three different scales. His free plans and instructions will help you dress up any indoor railroad or holiday village.
 Building a Tinplate-Inspired Railroad Crossing Sign - The perfect add-on for any vintage-inspired railroad or Christmas village, with free, downloadable instructions, plans, and graphics for modeling in several scales. Building a Tinplate-Inspired Railroad Crossing Sign - The perfect add-on for any vintage-inspired railroad or Christmas village, with free, downloadable instructions, plans, and graphics for modeling in several scales.
Other Articles about cardboard houses include:
To Return to the BIG Indoor TrainsTM Primer Page, click here.
|


|