|
Note from Editor: Project designer Howard Lamey has made whole villages of vintage-style cardboard structures. This project is one result of me sending him a "care package" with many printed sheets from the Resources page. Howard was already building these little barns for friends, but he was newly inspired when he received my "building texture" sheets. This is what he sent me.
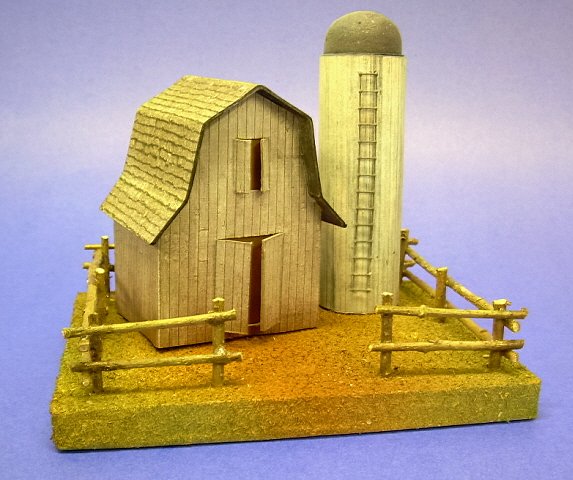
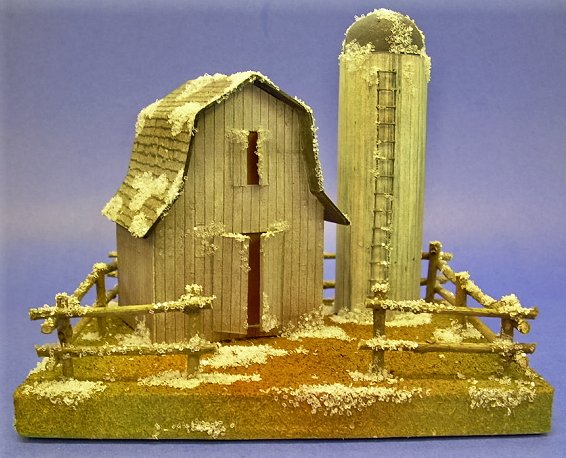
Building a Vintage-Style Cardboard Barn and Silo
This barn and silo are proportioned to look right with "Christmas Villages," both the new ceramic and resin kind, and the original cardboard and celophane kind that was especially popular between World Wars. It is not quite a "glitterhouse," because the walls and roof are finished with printed graphic paper instead of paint and glitter. However most of the construction is very similar to building a glitterhouse, so we will refer to articles on glitterhouses in general from time to time.
What You Will Need
If you are going to build cardboard houses, stop throwing away used, clean cardboard yesterday. Save cereal boxes, the backs of writing tablets, anything flat, firm and clean, that you can save. This pattern doesn't require any corrugated cardboard, but it wouldn't hurt to keep some of that on hand, too. In addition, for this project you'll need:
- A sharp mat knife or Xacto knife
- Elmer's white Glue-All. A glue stick would also come in handy.
- About a cup of sawdust
- Clear glitter (optional)
- Several sheets of acid-free white bond paper
- Acrylic beige paint
- Some means of spraying light brown and light green. This could be paint cans, or a spray bottle you can use with acrylic paints.
- Other paint as desired
- A few square inches of hardware cloth for the fence (optional)
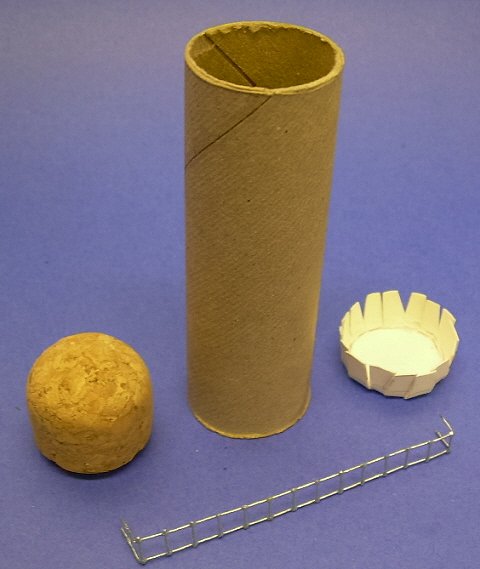
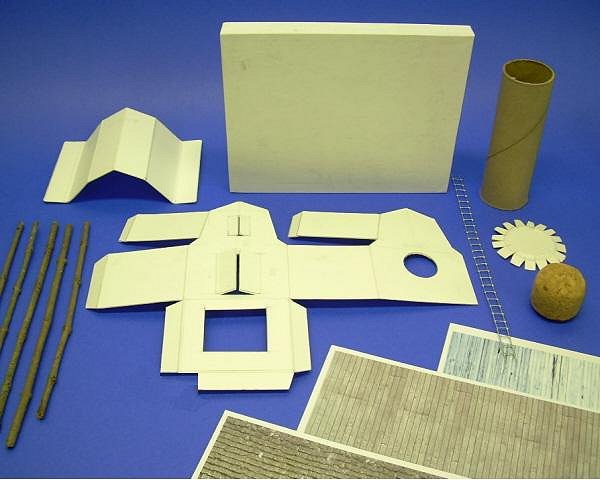
- A piece of tube from a paper towel or wrapping paper roll for the silo.
- Something to use for the silo top. This article shows a piece of cork. A rubber or styrofoam ball that fits just right into the tube would work, too. (If you use styrofoam, don't use spray paint to paint it.)
- Supple twigs for the fence and fence posts.
- Access to the Internet and a color printer.
- Yellow vellum, celophane, or similar translucent medium, if you plan to illuminate the barn.
For a more comprehensive list of tools and supplies that come in handy on any cardboard house project, please refer to our article What You Need to Build Glitterhouses.
Print The Patterns
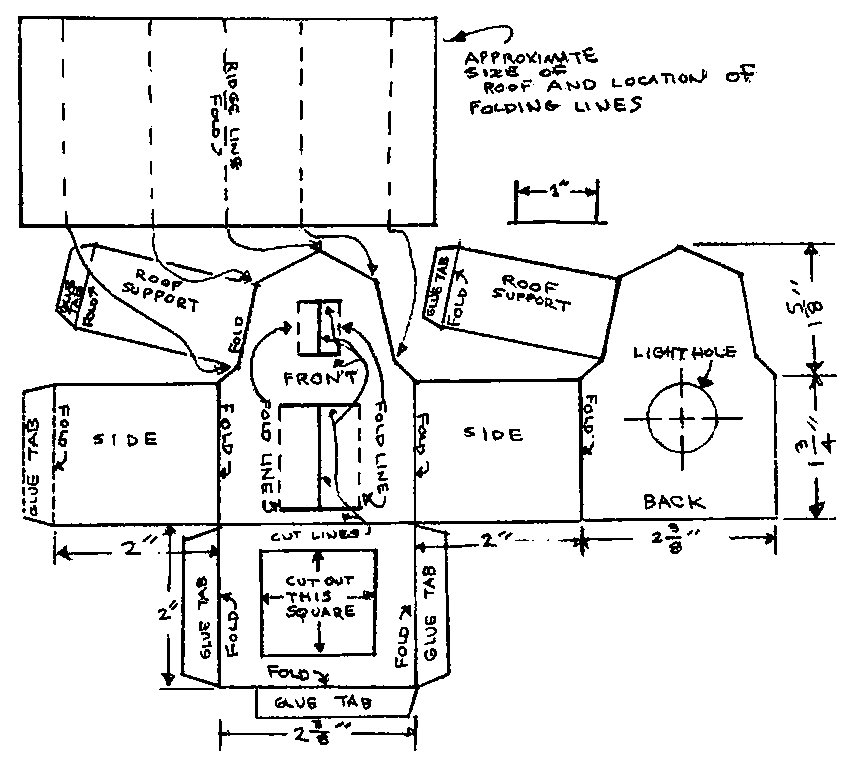
This project has a structure pattern that you will need to cut out and transfer to cardboard, as well as three texture sheets that you will use to finish your barn's appearance.
You may print the structure pattern on any sort of paper, since you're simply using this to transfer the plan to your cardboard medium.
Printing the Plans - We've provided two versions to help you print the plans at the size you need.
- If you have Adobe Acrobat Reader on your computer:
- Click here to open the pdf version of the first sheet. Select the print option, tell it to "auto rotate and center" or whatever else you need to make it go to Landscape mode. Don't select the "scale to page" or "shrink to fit" option. Print.
- Click here to open the pdf version of the second sheet. Print as you did the first sheet.
- If you don't have Adobe Acrobat Reader on your computer or for some reason that doesn't work, click on the pattern illustrations above to open a big .jpg version of each pattern. Choose the "file, page setup" from your browser. When the page setup menu comes up, select "landscape mode." You should also disable the "print to fit" option if you have one.
If neither of those work, contact
Paul and ask him for help - that's his department. :-)
Printing the Patterned Paper - The patterns used on this barn are from the Big Indoor TrainsTMBuilding Texture pages. If you would like to try a different pattern, please check them out. In the meantime, the following patterns will give you the same graphics used in this project. Print each on acid-free bond paper at the highest quality setting your printer allows.
Note: If you are interested in building for larger scales, you will find larger versions of the same patterns at the Family Garden TrainsTMBuilding Textures page.
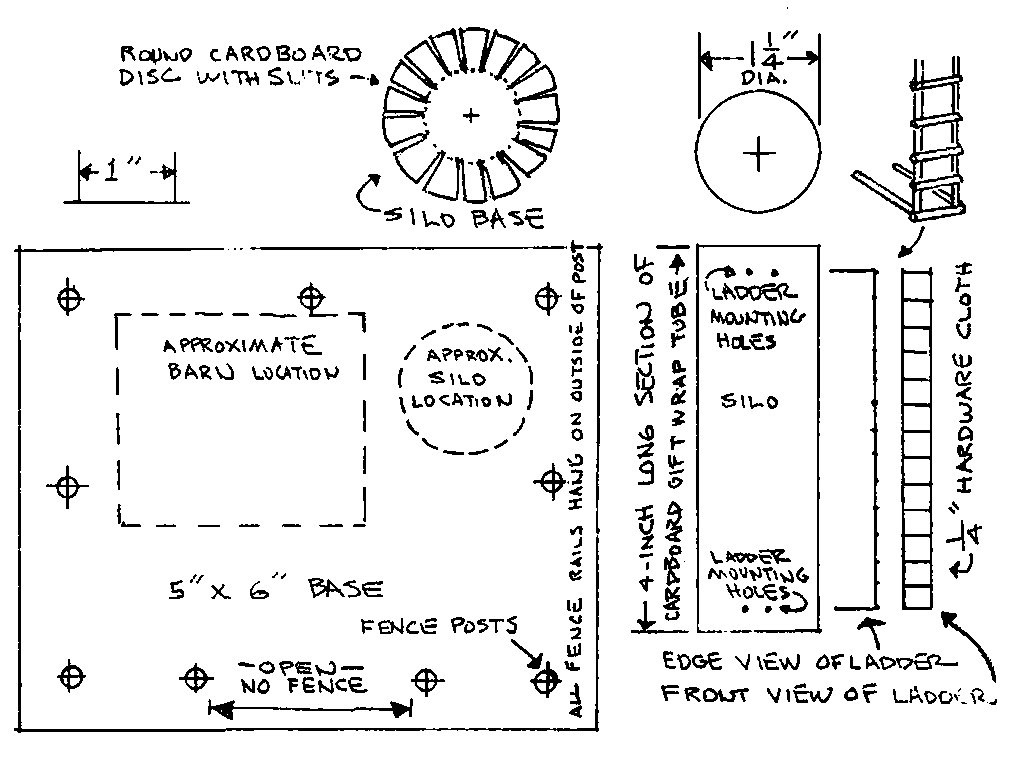
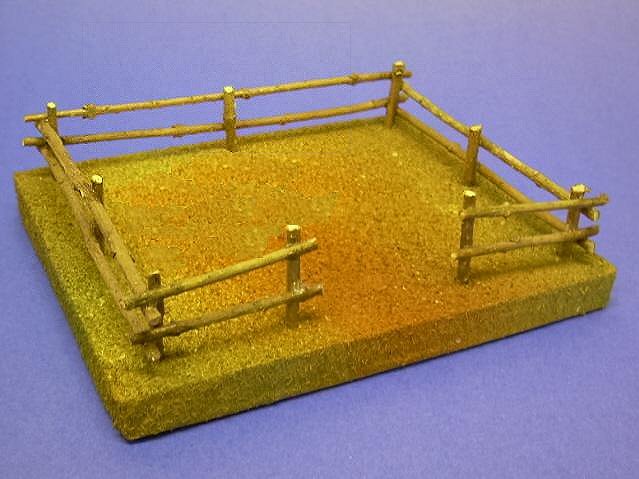
Building the Base
The base is a rectangular "box" that is decorated before the barn and silo are installed. It should be about 5" x 6" x 1/2".
- Make the base from four layers of corrugated cardboard glued together in a sandwich.
- Wrap and glue a strip of cereal-box cardboard all around it to camouflage the rough edges of the corrugated cardboard.
- When the base is built, you then cover it with white bond paper just like you would wrap a gift, except that all surfaces of the paper cover must be glued down to the box. A glue stick works great for this.
Note: For more information about building bases for vintage-style cardboard houses, please see our Glitterhouse Bases article.
- When the glue has dried.
- Drill holes in the base to fit the twig fence posts.
- Paint the base with an acrylic beige paint.
- Spread the Elmer�s Glue-All over the top and sides of the base (except for the holes) and sprinkle sawdust over it. Press the sawdust into the glue a little and make sure there aren't any major "holes" in coverage. Then set the base aside and allow it to dry.
 "Mist" the sawdust with light brown and green, and any other colors you would like to try. Use a random pattern. The barn and silo, and any accessories are glued on later. "Mist" the sawdust with light brown and green, and any other colors you would like to try. Use a random pattern. The barn and silo, and any accessories are glued on later.
- Cut twig fence posts to length and install with glue
- Glue twig fence rails to posts. Clothes pins make good clamps. You can also tie rails to posts with dark color buttonhole thread and apply glue.
Building the Barn
 For sanity's sake, you make certain that all of your measurements are good before you glue the patterned paper on. For sanity's sake, you make certain that all of your measurements are good before you glue the patterned paper on.
- Transfer the patterns to cardboard.
- Score the fold lines of the barn walls, then cut out that piece and fold on score lines. You may paperclip the barn together while you are testing the roof if you wish.
- Cut out the roof piece. Score only the fold for the peak of the roof at first. Put the peak of the roof on the highest part of the barn walls and work outward, checking fold locations by actual roof line measurements. You may have to make more than one roof to get best fit.
- Paint the exposed edges of cardboard that will not be covered when the printed siding and roof are applied.
- Paint the underside of roof overhang plus back of hayloft and barn doors.
- Paint the inside of the barn black.
- Apply the printed graphics of siding and roof. Do a section at a time. Measure carefully, make crisp folds, apply glue and press in place. You're better off leaving the graphic paper a tad long than a tad short.
- Trim the edges of the graphic paper, if ncessary.
- Cut opening slits so that hayloft and barn door will open. (Note: you will see white edges of paper that siding and roof graphics are printed on when you cut pieces to fit various surfaces. With a felt-tip pen, marker, or acrylic paint and a very tiny brush, carefully coat just the edge of paper and touch up the edge of cardboard if needed.)

- Assemble barn; let it dry, then glue on the roof.
- If you plan to illuminate the barn, install yellow or orange velum behind hayloft and barn door openings.

Building the Silo
The silo body is section of cardboard tube from a paper towel or gift wrap paper roll.
- Glue the silo base disc inside the lower edge of the silo body.
- Glue the printed graphic siding to the outside of the silo body.
- The roof can be a pointed cone rolled from cardboard, a foam ball from craft store or ping-pong or rubber ball if the diameter is right for silo body.
 The silo roof shown was made from a piece of cork. Prime and paint the silo roof and glue it in place. The silo roof shown was made from a piece of cork. Prime and paint the silo roof and glue it in place.
- The ladder is made from a strip of 1/4-inch hardware cloth. When you cut the piece out, leave four short wires sticking out the ends so you have something to attach to the silo. Punch small holes in silo body to receive ladder rail extensions as shown on drawing.
Finishing Details
I decided to �age� and �weather� barn and silo just slightly so there was not a stark contrast between printed graphics and base
 Spray the silo all over with fine mist of gray primer and spray the bottom edge with fine mist of the brown spray you used on the base. Spray the silo all over with fine mist of gray primer and spray the bottom edge with fine mist of the brown spray you used on the base.
- Spray lower edge of barn walls and door with fine mist of brown
- Apply several light coats of clear satin spray on entire project to protect printed graphics and base
- Glue barn and silo to base. Note that barn location is just slightly different angle than drawing. This was done to create �visual interest�.
 If you want to use this building with Halloween or Christmas villages, you can add some frost. When everything is glued together and the glue has dried, use clear glitter sprinkled over Elmer�s Glue-All to add little touches of frost on the roof, chimney, fence, and base. If you want to use this building with Halloween or Christmas villages, you can add some frost. When everything is glued together and the glue has dried, use clear glitter sprinkled over Elmer�s Glue-All to add little touches of frost on the roof, chimney, fence, and base.
Conclusion
I can still use the barn and silo in my �Pine Mountain Valley� Christmas display village and railroad just by adding a handful of artificial snow to the roofs and base.
 The Big Indoor TrainsTM Resource pages include several other downloadable, cleaned-up building texture pages in several size ranges for you to use for similar projects: The Big Indoor TrainsTM Resource pages include several other downloadable, cleaned-up building texture pages in several size ranges for you to use for similar projects:
Now that I'm in "retirement," this hobby has become a sort of avocation for me. Several folks have commissioned me to build specific houses for them. So if you'd like me to "bid" on a cardboard house for you, or if you have any questions at all, please use this link, and Paul will forward your information to me.
Also, if you have a similar project you'd like to share with your fellow readers and hobbyists, we'd love to add it to our site, and we'll be sure to give you full credit for your contribution.
Other Articles about cardboard houses include:
To Return to the BIG Indoor TrainsTM Primer Page, click here.
|


|