 | |||
 |  |  |
 |  |
 |  | ||
 |  | ||
 |  | ||
for Big Indoor TrainsTM and LittleGlitterHouses.comTM |
Nestles' Quik Diner ProjectMore Tribute to Tinplate!
Although several model roadside diners have been made to go with O gauge trains, most of them have been plastic. These projects were made to go with earlier trains, such as the early 20th century trains that were mostly made out of tinplated steel, and given "detail" by a lithography process that is all but lost to us today.
What You Will Need
A Note about ScaleBecause my Marx tinplate trains are smaller than they would be if they were actually built to scale, Paul has calculated the door heights, etc. for this project as closer to S scale. This size looks good, not only with old toy trains, but also with Christmas villages, so it will be the favorite size with folks who try this project. The plans are also in S scale.
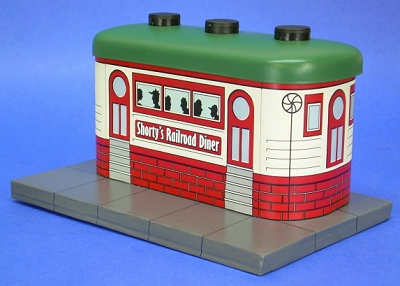
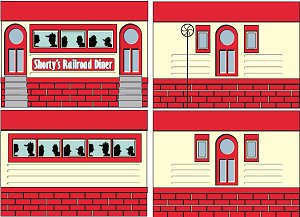
Each sheet should be printed on acid-free high-grade paper or card stock. Note: Consider printing this sheet in black and white first to double-check the size against your shell. "Year-Round" - For the "Year-Round" version (above), colored to harmonize with popular Lionel, AF, and Marx color schemes, download the Shorty's Diner Ends and Sides graphic.
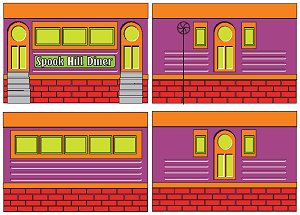
Halloween Graphics - To make a seasonally creepy version of this project for your Halloween-themed village or railroad, download the Halloween Diner graphics. If you like this project, check out our Spook Hill Halloween-themed building projects for your seasonal railroad or village. Our Halloween-themed storefront projects even use the same tinplate-inspired graphic style as this project. Christmas Graphics - Also, if you don't have Adobe Acrobat Reader on your computer or for some reason that doesn't work, contact
Paul and ask him for help - that's his department. :-)
A note about Copyright - However you use these plans and graphics for your personal use, please keep in mind that the lithograph graphic is copyright 2009 by Paul Race and is not to be copied, re-used, republished, or repurposed without prior permission and appropriate credit. Commercial use without prior permission is illegal and expressly forbidden.
Cut the ShellCarefully measure 2 1/4 inches above the metal bottom of the container. Draw a line all the way around and cut the container evenly on the line. If you want, you may continue working on the shell using the instructions below the base building and painting instructions, but you need to have at least this step done so you can test the fit of the foundation before painting the base.Building the Base The base is a rectangular "box" built up from corrugated cardboard. The base is a rectangular "box" built up from corrugated cardboard.
The foundation will be covered once the building is fastened together, so it may be a single piece of thick corrugated cardboard or a piece of foam core board. To get the dimensions for this, trace around the Nesquik container (the end with the metal on it which will become the roof), then cut about 1/16" inside your trace line all the way around. The final fit should be snug, but not forced. Painting the Base When you're certain that the diner will fit on the base properly, prime the base and paint it with several coats of glossy paint in the color of your choice. Industrial gray was the color most often chosen for this kind of structure in the tinplate days. When you're certain that the diner will fit on the base properly, prime the base and paint it with several coats of glossy paint in the color of your choice. Industrial gray was the color most often chosen for this kind of structure in the tinplate days.
For this project, I also "graphed out" squares to represent sidewalk lines and drew them in with a fine black ball-point pen. Test Fitting and Prepping the Shell The photo to the right shows the shell being test-fitted on the base. In addition, I have drilled three holes for the screw caps that will represent the roof vents and sanded the sides to make them less slick. The photo to the right shows the shell being test-fitted on the base. In addition, I have drilled three holes for the screw caps that will represent the roof vents and sanded the sides to make them less slick.
I then wrapped masking tape all around the body and made certain each edge and seam was completely down. I did this to help the craft glue take hold. When I built this, I fastened the screw covers that would represent the roof caps down before I primed and painted the shell. In retrospect, I should have left them off until after I painted, because the black would have made a nice contrast. Prime and Paint the Shell In the photo to the right, the shell has been primed and the roof painted. You can also see the masking tape. (No, this isn't a really big Duplo.) In the photo to the right, the shell has been primed and the roof painted. You can also see the masking tape. (No, this isn't a really big Duplo.)
You don't have to have vice grips to paint the shell. In fact, if you wait to put the screw caps on until after you paint, you won't be able to. :-) In the meantime, I find having a few clamps on hand makes painting small parts much easier. Attach Screw Caps The photo to the right shows the way I attached the vents to the roof. I used oversized washers to go under each "vent," then used bits of thin plywood to hold the sheet metal screws from the inside. I could have used nuts, bolts, and washers instead. The photo to the right shows the way I attached the vents to the roof. I used oversized washers to go under each "vent," then used bits of thin plywood to hold the sheet metal screws from the inside. I could have used nuts, bolts, and washers instead.
Maybe as you look at the following photos, you could squint and pretend that the "roof vents" are black instead of green. :-) Try a "Mockup" Before you start gluing the graphics on, do one more "mockup," using scotch tape to put the graphics where you think they should go. This is your final chance to check the fit. Before you start gluing the graphics on, do one more "mockup," using scotch tape to put the graphics where you think they should go. This is your final chance to check the fit.
Note about Height: While you're doing your mockups, think about the height of the structure. On the graphics, Paul gave me extra "steps" and extra rows of bricks on the bottom so I could wrap the graphic around the bottom without any white showing. On my first attempt at this project, I forgot that was what the extra rows and steps were for and incorporated them into the structure. (So you can see five steps, not three on the photos of my "Shorty's Diner.") On this version I recommend having the graphic go down to 3 steps. But before you put the "real" graphic on, try setting this around the structures you think it will be near and make certain it doesn't seem too tall. Remember, this is YOUR structure, and the person you have to satisfy with this project is you. Apply the GraphicOnce you are satisfied with the appearance that the mockup suggests:
Final AssemblyOnce the glue is dry on all of the graphics, it is relatively simple to glue the structure solidly together.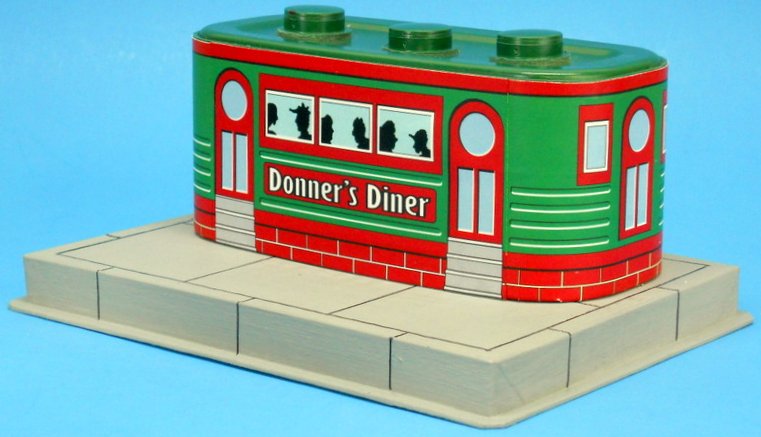 That said, you may want to check on it every so often to make certain that something doesn't shift out of place while it is drying. That said, you may want to check on it every so often to make certain that something doesn't shift out of place while it is drying.
FinishWait until all of the glue is thoroughly dry (usually at least overnight), then spray the building with several light coats of a clear glossy indoor/outdoor acrylic finish. This protects it somewhat from moisture and dust. It also helps reduce fading and makes the lithography pattern "pop." Do not such a heavy coat in one pass that you cause any streaks, runs, or drips, though, or you'll have to start over. This usually looks good near a depot, somewhere where people waiting for or coming off a train might nip in for a cup of hot coffee. ConclusionIf you like this project, stay in touch - more are on the way. In the meantime, you might like to take a look at the following bonus graphic, as well as a long list of projects that would look good next to this one.Similar Projects
Other Articles about cardboard houses include:
To Return to the BIG Indoor Trains(tm) Primer Page, click here. |


|

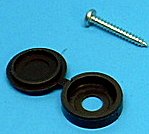 For the roof vents, I used plastic screw caps from a hardware store held on with sheet metal screws. I also used thin plywood squares to drive screws into. I could have used nuts and bolts instead.


 More "Tribute to Tinplate" Articles
 Building TinPlate-Syle Store Fronts
 New
Feature - Building a Tinplate-Inspired Lamp Post
New
Feature - Building a Tinplate-Inspired Lamp Post New
Feature - Building a Tinplate-Inspired Watchman's Shanty
New
Feature - Building a Tinplate-Inspired Watchman's Shanty New
Feature - Building a Tinplate-Inspired Railroad Crossing Sign
New
Feature - Building a Tinplate-Inspired Railroad Crossing Sign


 Building the Union Station

|

| |
 |
 |
 |
 |
| Note: Big Indoor Trains(tm), Big Train Store(tm) Family Garden Trains(tm), Big Christmas Trains(tm), and Garden Train Store(tm) are trademarks of Breakthrough Communications(tm) (www.btcomm.com). All information, data, text, and illustrations on this web site are Copyright (c) 1999, 2000, 2001, 2002, 2003, 2004, 2005, 2006, 2007, 2008, 2009, 2010, 2011, 2012, 2013, 2014 by Paul D. Race.
Reuse or republication without prior written permission is specifically
forbidden.
Big Indoor Trains(tm) is a participant in the Amazon Services LLC Associates Program, an affiliate advertising program designed to provide a means for sites to earn advertising fees by advertising and linking to amazon.com. For more information, contact us. |