You Are Here.
Jump to other pages.
 Click for bigger photo.Return to Big Indoor Trains<sup><small>TM</small></sup> primer pageOn30 Display Trains
O Scale Accessories
O Gauge Christmas TrainsOn30 Christmas Trains

Written by Howard Lamey and Paul Race for
Big Indoor TrainsTM and LittleGlitterHouses.comTM
Click to sign up for the 'Trains-N-Towns<sup><small>TM</small></sup>' newsletter, with articles about display villages, indoor railroading, and much more


Click to see Halloween Trains and Towns for your seasonal displays.


Click to see the Internet's largest buyers' guide of trains that are just the right size for indoor displays.


Click to see John Deere Collectible Villages and more!


Note from Editor: Project designer Howard Lamey has begun a groundbreaking series of vintage-style cardboard structure projects just for Halloween. After he made a great train station, I sent him a couple signs for him to use, and he decided to use them as billboards. This is a quick "how-to" on doing the same thing for your Halloween village.

Spookey Village Billboards

A Spook Hill<sup><small>TM</small></sup> billboard in context. Click for bigger photo.
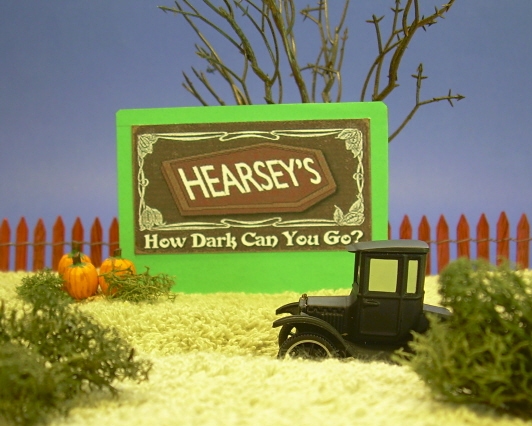
These billboards are easy additions to the Spook HillTM community of custom-built, vintage-style Halloween display village houses. They would also look good with any Halloween village, including the Hawthorne Village® Halloween trains and Villages

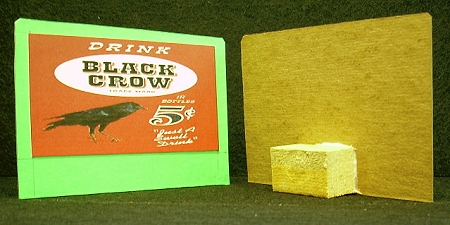
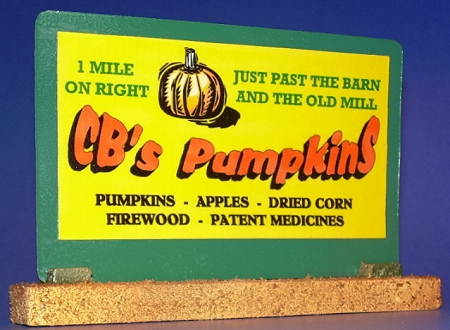
It's also the easiest Spook HillTM structure to build so far, so it would be a good project to get the kids involved with.

What You Will Need

Clean cardboard (used is fine). The best kind for this project is heavy chipboard, that is - thick, but solid cardboard like that on the back of writing tablets. If you don't have that, you could alway use fine corrugated cardboard like the kind the post office uses for express mail, and paint it in such a way that the paint smooths out the rough edges.

Note for Outdoor Railroaders - If you're making billboards to go outside, consider using a weather-resistant material like thin plywood, Lucite glazing, or road spam (those obnoxious fluted plastic signs they put on your street corner in the dead of night). I'd also consider using stakes to install billboards outside instead of "stands," as shown in this article.

In addition, for this project you'll need:

  • A sharp mat knife or Xacto knife (recommended, but very good scissors will do for this craft)
  • Elmer's white Glue-All
  • Two sheets of acid-free white bond paper or white card stock
  • Acrylic craft paint
  • Clear acrylic satin spray to provide a protective finish
  • Access to the Internet and a color printer.
  • Clear glitter (optional)
For a more comprehensive list of tools and supplies that come in handy on any cardboard house project, please refer to our article What You Need to Build Glitterhouses.

Print The Advertisements

Click to download the full-sized graphic.This project has fake seasonal advertisements that you can download and print on a color printer. For O-scale or holiday villages, download the pdf version by clicking on the photo to the right. Print the graphic on acid-free bond paper or light card stock at the highest quality setting your printer allows. Of course, you can make your own billboards if you want, by cutting ads out of magazines or whatever. (If your family buys many decorations for Halloween, you might be able to find promising graphics on the packaging.)

If you want to use them for a Large Scale railroad, or if you want to resize them yourself, download the jpg version (a 1.7meg files). If you do that, try changing your printer to landscape mode and printing them as large as your printer will allow. If for some reason, this doesn't work out for you, contact us and we'll try to help.

Designing Around the Advertisements

Once you've printed the advertisements in the size you think you want, cut them out and lay them on a piece of scrap paper. Draw a box around each one that is between 1/8"-1/2" on the top and sides and 1/2"-2" on the bottom. Adjust the "box shape" until it looks right to you. Then use that as a pattern to cut out the supporting wall and any material you choose to use to cover it.

Building the Supporting Walls

  • For each billboard, cut out a pieces of heavy cardboard the size of the box you drew around your advertisements. If you want, you can "nick" off each top corner to give it a more finished look.
  • Click for bigger photo.Paint the cardboard, including the top and side edges of the walls with black paint. Again, if you have used thin corrugated stock, you can use the paint to disguise the rough edges somewhat.
  • Cut out the advertisement(s) if you haven't already. With a fine black marker, felt tip pen, or acrylic paint, carefully coat just the edge of the paper or card stock that the advertisement is printed on.
  • Apply the printed graphic to the supporting wall. Center carefully so that the distance from the top and sides is the same, apply glue and press in place.
  • Glue the advertisement to the supporting wall.

    Attach a Brace or Stand

    Click for a bigger photo.The Black Crow and Hearsey's billboards shown on this project simply have blocks of wood glued on the back to hold them upright. Howard has also experimented with full-length stands as shown in the photo to the right. The stand is made of layered corrugated cardboard, like the base of many of Howard's vintage-style cardboard village. It is then:

    • Wrapped in acid-free white bond paper,
    • Painted a mix of fall colors (such as green, brown, and orange),
    • Given a light coating of sawdust (using Elmer's Glue),
    • Touched up again with fall colors, and
    • Glued to the billboard's supporting wall.

    Finishing Details

    1. Apply several light coats of acrylic satin spray to provide a protective finish. Don't try to put one heavy coat on at first - the ink from your color printer may run, which may not give you exactly the effect you were looking for.
    2. Sorry, I don't have a bigger version of this photo.If desired, when all the glue and satin spray has dried, use clear glitter sprinkled over Elmer’s Glue-All to add little touches of frost.

    Conclusion

    Paul speaking here: When Howard was done taking photos for this year's Spook Hill projects, he sent me the Black Crow and Hearsey's billboards, along with the station and water tower he had built while creating this project. Due to Howard's careful craftsmanship, these fun projects have produced what could easily become a family heirloom. Once again, I am glad to be able to help Howard bring his project ideas to our readers.

    Once you do a couple of these billboards and try them out on your village, you'll be looking at print advertisements and cardboard packaging for more ideas.

    Plug for Howard

    Howard has often been "commissioned" to design and or build vintage-style cardboard houses for collectors and fans of this delightful, but underrated art form. That's why he started his own web site, LittleGlitterHouses.com. If you would like to ask Howard to bid on a project for you, or if you have any questions for Howard, stop by there and you'll find direct contact information. If you have any questions for Paul, use this link.

    Finally, if you have a similar project you'd like to share with your fellow readers and hobbyists, let us know. We'd love to add it to one or both of our sites, and we'll be sure to give you full credit for your contribution.


    Other articles about Halloween houses, villages, and trains include:

    Other articles about cardboard houses include:

    To Return to the BIG Indoor TrainsTM Primer Page, click here.Return to Big Indoor Trains<sup><small>TM</small></sup> primer page

Click to see unique Disney Halloween village collectibles and more


Tim Burton's The Nightmare Before Christmas Express Illuminated Train Collection


The Munsters(TM) Express Halloween Train Collection


Universal Studios Monsters Express Halloween Electric Train Collection


Disney Villains Collectible Halloween Village Collection: Unique Halloween Decor


Tim Burton's The Nightmare Before Christmas Village Town Collection


Home Pages
Reading Index Pages
Buyer's Guide Pages
Return to Big Indoor Trains Home page Return to Family Garden Trains Home page Big Indoor Trains Primer Articles: All about setting up and displaying indoor display trains and towns. Garden Railroading Primer Articles: All about getting a Garden Railroad up and running well Garden Train Store: Index to train, track, and other products for Garden RailroadingBig Christmas Trains: Directory of Large Scale and O Scale trains with holiday themes
On30 and O Gauge trains to go with indoor display villages and railroads


Click to see exclusive, licensed Disney(r) train and village collections!

Note: Big Indoor TrainsTM, Big Train StoreTM, Family Garden TrainsTM, Big Christmas TrainsTM, Garden Train StoreTM, and Trains and TownsTM and HallowenTrains.comTM are trademarks of Breakthrough Communications (www.btcomm.com). Spook HillTM is a trademark of Howard Lamey. All information, data, text, and illustrations on this web site are Copyright (c) 1999, 2000, 2001, 2002, 2003, 2004, 2005, 2006, 2007, 2008, 2009 by Paul D. Race. Reuse or republication without prior written permission is specifically forbidden.
Big Indoor Trains(tm) is a participant in the Amazon Services LLC Associates Program, an affiliate advertising program designed to provide a means for sites to earn advertising fees by advertising and linking to amazon.com.


For more information, contact us.

Click to see exclusive, licensed train collections in your favorite team colors!