|
Note from Editor: Howard Lamey, in Jacksonville, Florida, has retired from a full-time job in advertising that included designing window displays for a major retailer. Now he has turned those artistic talents to designing and building vintage-style cardboard buildings for his family and friends.
(We have a brief introduction to glitterhouses and "putzes" in the article "What is a Glitterhouse?") Howard has started his own site, but he has graciously agreed to share his craft knowledge with our readers.
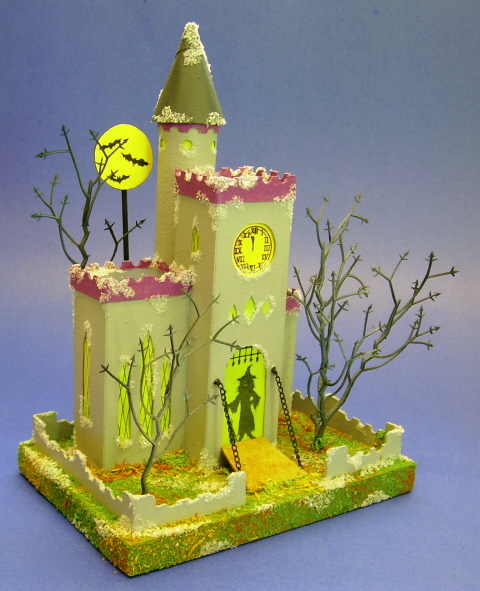
Spook HillTM #1 - Stately Pane Manor
Though I've been making little vintage-style cardboard houses and castles for Christmas for some time, I tried something new last fall. I designed a Halloween house for my grown children's families' halloween decorations. It was such a hit that this year we plan to offer a whole community of Halloween building projects.
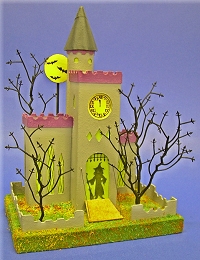
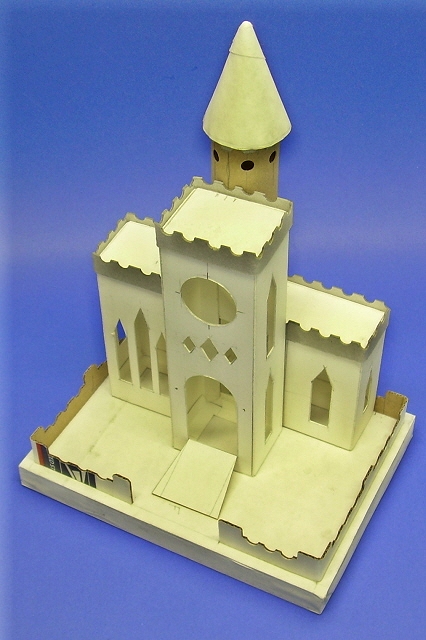
The house shown in the photo is the first one we designed specifically for this community, now designated "Spook HillTM." (The TM is there to keep ten other people from doing the same thing under the same name - if you have similar projects, let us know, and we may be able to share links or something - just don't call it "Spook HillTM," or I'll send my town's denizens after you.)
This structure is based on forms typically used in some of the more elaborate cardboard Christmas houses that were made in Japan between 1920 and 1930. It's the first one I've ever seen with a Halloween theme, though.
What You Will Need
Clean cardboard of every thickness. Cereal boxes, the backs of writing tablets - anything flat, firm, and clean, that you can save. Please keep some corrogated cardboard on hand, too - it makes the best bases.
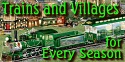
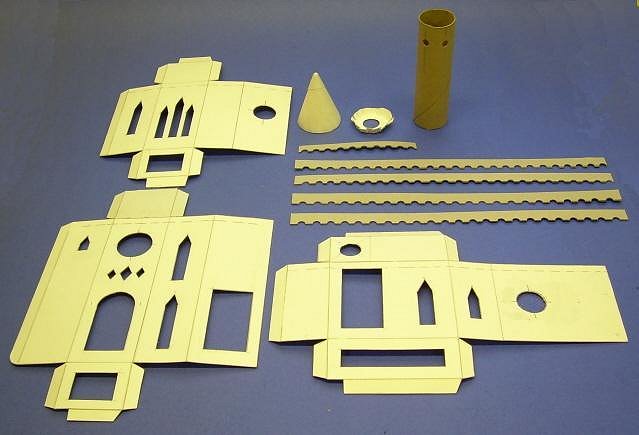
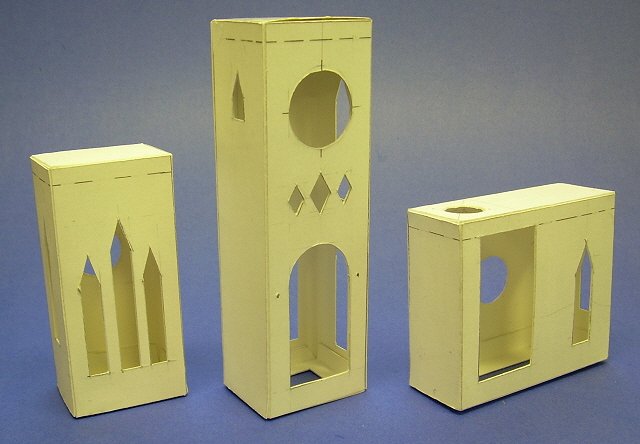
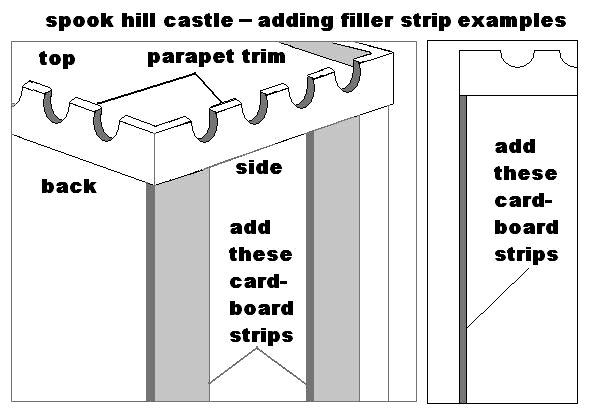
The 3-window section, back section and clock tower are cardboard cut-outs with cardboard �parapet� trim around the top edge.
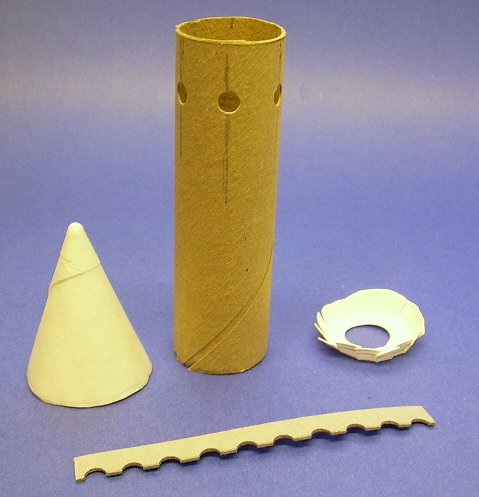
The round tower is cardboard tube from a roll of gift wrap. Add a spire cut from 3 cone shaped paper water cups which have been glued together, one inside the other for strength. In addition, for this project you'll need:
- A sharp mat knife or Xacto knife (or both)
- A stiff metal ruler
- Elmer's white Glue-All. A glue stick would also come in handy.
- Clear glitter. I use the �Sulyn� brand.
- Several sheets of acid-free white bond paper
- Flat white paint (flat latex interior wall paint is good) to prime the building (and give it the chalky feel of the original)
- Acrylic or textured paint in the colors you plan to use for the house.
- Fine sand for mixing with paint, unless you buy textured paint.
- Other accessories, such as a silk flower stem or two that you can use to make "dead trees." (In fact we have a whole article on this subject.)
- Sawdust to give the "grass area" texture
Note:: Our article on What You Need to Build Glitterhouses lists many other materials and tools that will help you work more quickly and effectively.
Printing the Plans
You should be able to print the big version at the size you need either of the following ways.
- If you have Adobe Acrobat Reader on your computer, click the following links to see the PDF versions:
Select the print option, tell it to "auto rotate and center" or whatever else you need to make it print the right direction on the page. Don't select the "scale to page" or "shrink to fit" option. If these pages don't print the right size, the pieces you cut from them won't work together. Print.
- If you don't have Adobe Acrobat Reader on your computer or for some reason that doesn't work, open the big JPG versions by clicking on the reduced plans above. Choose the "file, print" from your browser. If you CAN choose to NOT scale the picture, do so (you may need to select "landscape" for some of the files). This may mean that part of the page gets clipped on your printer, but the plan should sprint to the right size. If they don't you should be able to tweak the size either in the print program or in any graphic program you have on your printer.
If neither of those work, contact
Paul and ask him for help - that's his department. :-)
Building the Base
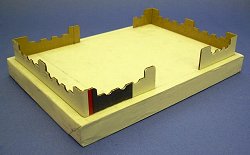
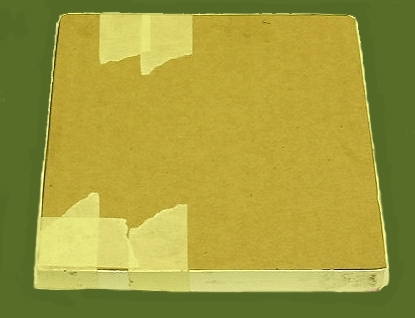
The base is a rectangular "box" that is decorated before the house and trees are installed. For this project, it should be about 7" wide and 5" deep, built up from four layers of corrugated cardboard, wrapped with acid-free bond paper. (See our article on Building Glitterhouse Bases for more information.)
Note: For this project, Howard cut the base and fence pieces out at the same time. (See Sheet #4 above). The fence pieces are made from the thin kind of corrugated cardboard that they use for Express Mail boxes, although thick cardboard from the back of a legal pad would do as well. If you wish, you may use different materials for the fence, including miniature wooden snow fence from the craft store or a rustic rail fence you make from twigs.
Cut And Glue The Base - Usually the best method is to make a base from layers of corrugated cardboard glued together in a sandwich. You then wrap and glue a strip of thin poster-board or cereal-box cardboard all around it to camouflage the rough edges of the corrugated cardboard.
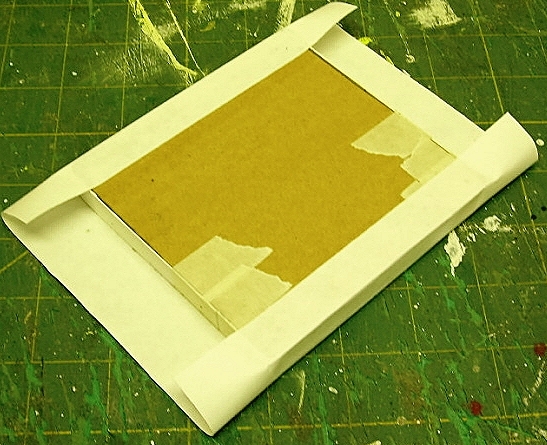
Wrap the Base - When the base is built, you then cover it with white bond paper just like you would wrap a gift, except that all surfaces of the paper cover must be glued down to the box. A glue stick works great for this.
 Attach the Fence - When the glue on the base has dried, glue the fence pieces to the base. Attach the Fence - When the glue on the base has dried, glue the fence pieces to the base.
Prime the Base - When all the glue has dried, paint the base with the flat white paint. This provides an even finish that will hold the acrylic paint and glitter. If the fence is made of cardboard, prime it, too. If you used corrugated cardboard for the fence, dab a little extra into the openings on the top to help seal them. By the time you've added the final coat, the openings shouldn't even be noticeable.
Prepping the Structure Pieces
The 3-window section, back section and clock tower are cardboard cut outs with cardboard �parapet� trim around the top edge. For this I prefer to use thicker noncorrugated cardboard, such as the cardboard from the back of a legal pad.
- Carefully transfer patterns of all pieces to the cardboard building stock. A .05 mm lead mechanical pencil and a �C-Through� brand ruler make this accurate and easy.
Note: On Sheets #1-3, there are also lines to show where to attach the parapet trim. Transfer these lines to your card stock, but do not score them.
- Put new blades in the mat knife or X-acto knife (or both) that you will be using.
- Score the fold lines before you begin cutting out the parts. Use the metal ruler or other steel edge as a guide.
- Still using a steel-edged ruler as a guide, cut out the shapes. Watch your fingers.
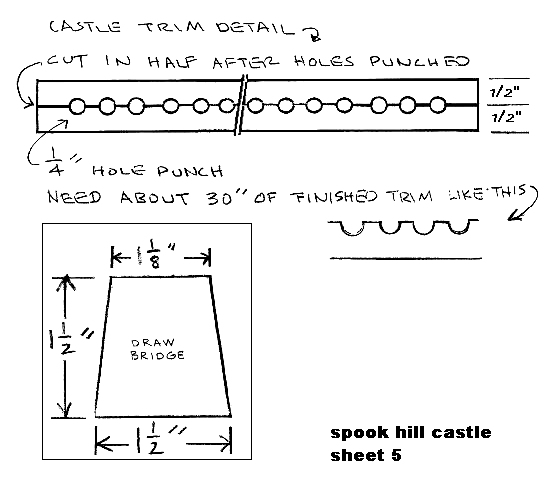
- Cut the parapet trim from the same thick stock if you have enough. I cut the parapet trim out twice as wide as it needed to be, drew a line down the center (lengthwise), measured, and punched holes. Then when I cut the parapet down the middle, as shown in Sheet #5 above, the parapet automatically had a serrated edge.
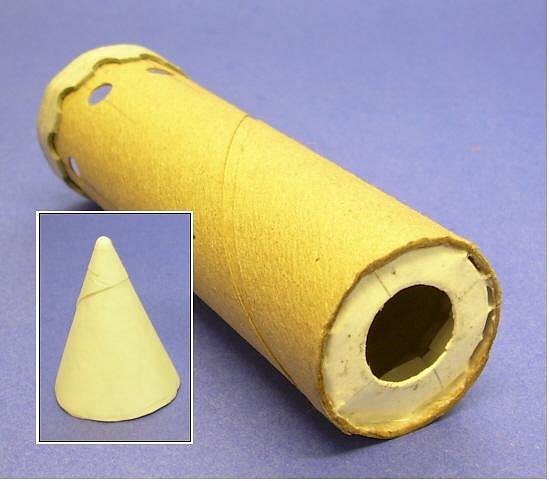
- You may cut the cardboard base for the round tower from a lighter stock. This goes into the bottom of the tower and the glue is allowed to dry, before you glue the tower together. It gives an extra surface for the glue to adhere to.
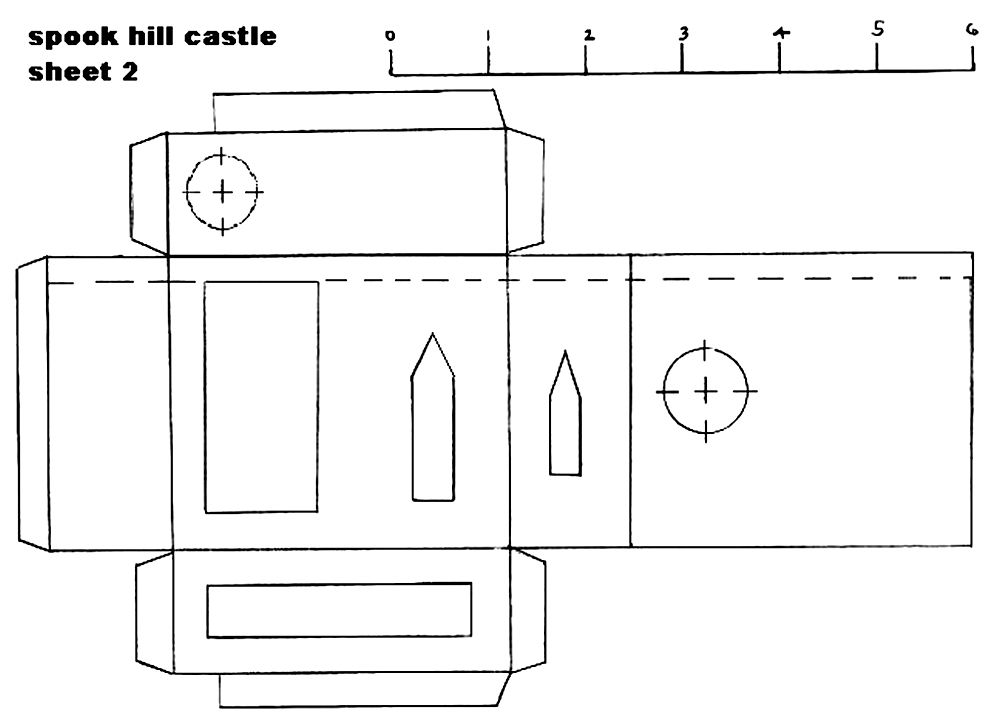
- Punch holes in the paper towel tube as shown in Sheet #6.
- Glue a piece of the parapet trim upside down around the top edge of the tower. But don't glue the top cone on until you've put yellow paper in the windows (see below).
- Glue together three of those little paper cups they put near water coolers. (Don't use them if they have wax on them.) If you don't have access to those, make your own cone out of light cardboard, like you get from cereal boxes.
Assembling and Painting the Manor
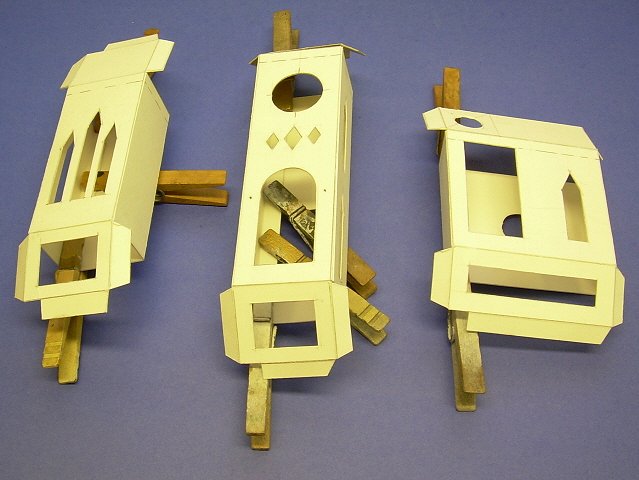
- Using Elmer's white Glue-All or a similar product, glue together the three sections (the pieces with the window cutouts).
White glue works best if you apply a thin coat to each mating surfaces and wait a few moments for the glue to become tacky before you press the surfaces together. You will need to let these dry for several hours.
- Glue the parapet trim onto the buildings following the guidelines from Sheets #1-3.
 On the two smaller sections, find the big rectangle cutout. That is the side that will be glued to the larger section (the cutout allows the light to come through). Glue a strip of card stock vertically on either side of the rectangle. This will allow that part of the building to lay "flush" against the big part and will help keep the light from coming out through the "cracks" between sections. On the two smaller sections, find the big rectangle cutout. That is the side that will be glued to the larger section (the cutout allows the light to come through). Glue a strip of card stock vertically on either side of the rectangle. This will allow that part of the building to lay "flush" against the big part and will help keep the light from coming out through the "cracks" between sections.
 Glue the building sections together, but don't glue the building to the base just yet. Also, you may want to wait to glue the tower to the rest of the building until you're ready to glue the whole thing down. The photo to the right shows the building sections glued together, and set onto the base to test placement. Glue the building sections together, but don't glue the building to the base just yet. Also, you may want to wait to glue the tower to the rest of the building until you're ready to glue the whole thing down. The photo to the right shows the building sections glued together, and set onto the base to test placement.
- Prime the building, including trim and tower roof, with flat white wall paint. Don�t skip this step; it gives you a uniform surface for painting. If you haven't already primed the base, do that as well. Prime the drawbridge, too.
- When the primer has thoroughly dried (usually overnight), paint the building the "base color" you selected. For my manor, I used leftover gray house paint and mixed in some fine sand for a slightly textured finish. After that was dry, I painted the trim details with acrylic craft paint.
- Paint the grass area of the base with swirls of greens and Fall colors. For my manor, I used a ground cover of sawdust, dyed with diluted acrylic paint in similar colors, sprinkled over a coat of white glue. Model railroad scenery ground cover can also be used.
- Download the witch, portcullis, and clock graphic to your computer. (If you try to print it directly from Internet explorer it will print several times too big.) Then print it on yellow paper at 300 dpi. The �slime green� paper came from the scrap booking department at my local craft store. The advantage of that is that it seems to be glowing even when the building isn't lit up. Alternatively, Paul has provided a version on a yellow background you can use. If you use the colored version, printing it at the highest quality on your color printer will help saturate the color.
- Cut them out, and glue into the main section as shown in the title photograph.
- From the leftover paper, draw the diamond shapes for the window mullions with a straightedge and black pen. Glue them in, too.
- If you haven't already done it, glue yellow paper behind the "porthole" windows in the round tower, then glue the cone on.
- Glue the building to the base.
- Add the cardboard draw bridge to the clock tower with small costume jewelry chains or black buttonhole thread.
Adding Final Touches
 If you wish to add frost, brush a very thin coat of white glue several places and sprinkle a light coat of clear glitter over the glue. Don�t try to do the entire house or base at once. White glue starts to film-over and dry quickly so just do a wall or a section at a time. The glue dries clear, so don�t judge the final look until the glue is completely dry. If you wish to add frost, brush a very thin coat of white glue several places and sprinkle a light coat of clear glitter over the glue. Don�t try to do the entire house or base at once. White glue starts to film-over and dry quickly so just do a wall or a section at a time. The glue dries clear, so don�t judge the final look until the glue is completely dry.
I also gave the entire project several coats of clear satin spray to protect the finish and to help the ground cover adhere to the base.
Add a few �dead trees� made from craft store floral picks. These are glued in holes in the base.
Download and print the full moon graphic on yellow paper and glue it a round cardboard disc with a bamboo skewer attached. Paint the back of the disk and skewer black.
If you want, add yard accessories such as a small figurine (cheap party favors and cake decorations are often suitable - it's okay if your accessories look a little "tacky").
Concluding Ideas
You can see that, when you get to the gluing, painting, and glittering stages, there's a lot of "hurry up and wait." That's one reason many people who build modern putz house recreations work on two or three houses at the same time - you can work on the second house while the glue is setting on the first one, and so on.
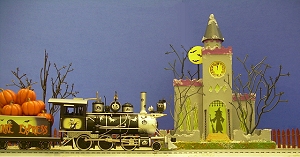 Using With Trains - While I was building this, Paul sent me a Hawthorne Village "Nightmare Before ChristmasTM" locomotive and a few cars. He wanted to give readers a sense of how this and the other Spook HillTM buildings would look with a commercial Halloween train. (This train and others are described on Paul's Halloween Trains web pages. Except for the holiday paint job, this train is actually an On30 model compatible with Bachmann's On30 trains, which were designed to look good with Christmas villages. Most HO trains would be a little smaller, and most Lionel trains would be a little bigger, so this should give you a pretty good idea of whether it will work with your train set. Using With Trains - While I was building this, Paul sent me a Hawthorne Village "Nightmare Before ChristmasTM" locomotive and a few cars. He wanted to give readers a sense of how this and the other Spook HillTM buildings would look with a commercial Halloween train. (This train and others are described on Paul's Halloween Trains web pages. Except for the holiday paint job, this train is actually an On30 model compatible with Bachmann's On30 trains, which were designed to look good with Christmas villages. Most HO trains would be a little smaller, and most Lionel trains would be a little bigger, so this should give you a pretty good idea of whether it will work with your train set.
Other Ideas For Decorations - I actually based part of this structure on a bigger structure I made for a Christmas village, so there's no reason you can't use other colors and make a Christmas version.
 Or download some of Paul Race's printable brick and stone papers and make an all-season building. Or download some of Paul Race's printable brick and stone papers and make an all-season building.
Of course you'll probably want a "normal" clock face for either of those projects. Click on the clock face to the right to get a downloadable "normal" clock face.
Commercial "Plug"
Now that I'm in "retirement," this hobby has become a sort of avocation for me. Several folks have commissioned me to build specific houses for them. So if you'd like me to help you design and build a special vintage pasteboard house for you, or if you have any questions at all, please see my site, LittleGlitterHouses.com for more information.
Also, if you have a similar project you'd like to share with your fellow readers and hobbyists, we'd love to add it to our sites or to our links, and we'll be sure to give you full credit for your contribution.
Other Resources for Putz Houses and Related Information
- Other Putz House Articles:
- Other Putz House Resources:
- "Papa Ted's Place" Ted Althof's extensive resource about vintage pasteboard houses. Includes some history, many photos from other people's collections, and resources to help you build your own. The links below will take you right to the approprate page on "Papa" Ted's site. You'll find lots of other pages to look at while you're there, though.
- LittleGlitterHouses.com - Putz house builder Howard Lamey now has his own site, begun in December, 2007. You can commission your own custom-built glitterhouse, or buy a precut kit and finish it yourself.
- Aimee Gomberg's original putz houses - unique collections for sale.
- Other Articles that Discuss Putzes and Christmas Villages of the mid-20th Century:
- About Nativities - Describes how German-American Nativity displays (the original "putzes") grew into communities and landscapes that included pastboard, glittered houses and even electric trains.
- What Do Trains Have to Do With Christmas - Describes how electric trains contributed to the communities many families set up at Christmas, with some details about the elaborate "Christmas Gardens" of the Baltimore/DC area.
- Author Antoinette Stockenberg's home page - includes photographs and comments on putz houses and life in general.
Note: Spook HillTM and LittleGlitterhousesTM are trademarks of Howard Lamey, North Jacksonville, Florida.
 To Return to the BIG Indoor Trains(tm) Primer Page, click here. To Return to the BIG Indoor Trains(tm) Primer Page, click here.
|


|


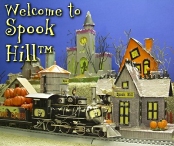 Introducing Spook HillTM


