 | |||
 |  |  |
 |  |
 |  | ||
 |  | ||
 |  | ||
| Written by Howard Lamey and Paul Race for Big Indoor TrainsTM |

|
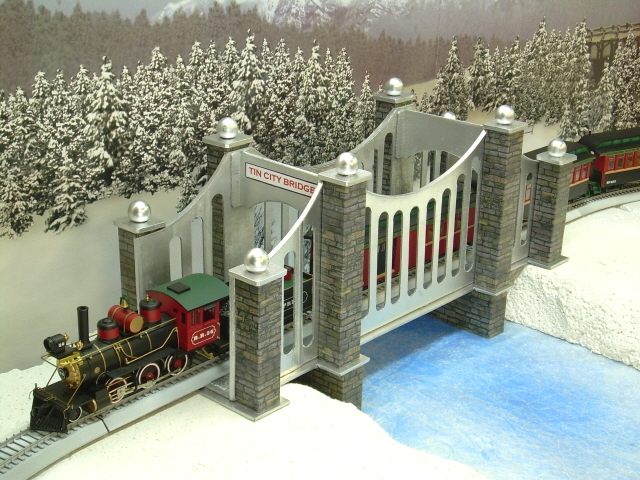
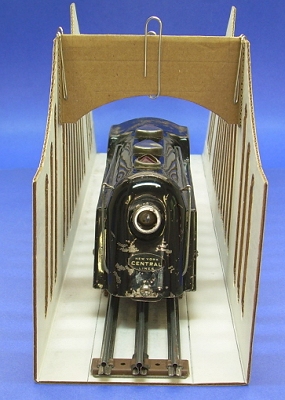
As you'll see in the photos, this bridge is a good size for On30 trains and O gauge tinplate trains as well. If you have O Scale trains, you'll want to check the height of the arches before you glue the whole thing together.
Building the Tin City BridgeWhen I started trying to represent iconic structures and accessories of the golden age of toy trains, I couldn't help noticing the bridges, especially the big ones like Lionel's Hellgate bridge. What would it take to make a bridge similar to that one but scaled for my O gauge tinplate trains?
Tools Needed:
Materials Needed:
Downloading the Plans
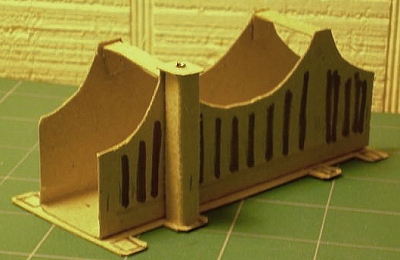
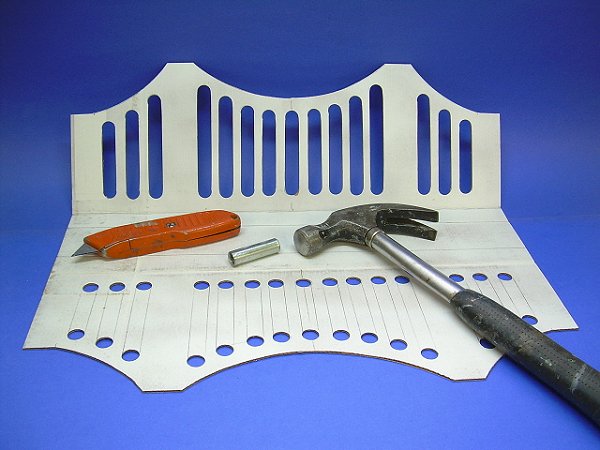
Chances are you need the O27/O gauge version shown in the photographs. The PDF versions of the plans are pre-scaled for you. (You'll need Adobe Acrobat Reader on your system to view and print them, but that's a free download from Adobe.) Click on the bold links in the dark boxes to get the plans you need. Print these files on cheap paper, since you'll be transferring the patterns to cardboard anyway. If you decide that you really need another size altogether, you can access a large .gif file by clicking on the graphics in the boxes above. Copy the .gif files into MS word or a similar program, and resize them to your heart's content. Downloading the PatternsI used a realistic stacked stone pattern from Paul's Building Textures Resource page. For this article, Paul has provided two alternate patterns you might like to try. Paul thinks that the stacked stone pattern (left below) is a very good match for Christmas villages and On30 trains (such as the Bachmann/Dept. 56 collector's train shown in some of the photos). The pattern below right might be helpful if you're trying to achieve a tinplate-era look for your bridge.Paul's Building Textures Resource page has other scales and patterns if you want to investigate other options. Chances are you need the O27/O gauge version shown in the photographs. Print these files on acid-free bond paper or light card stock. Print at least one copy for now, to get you started, but you'll need more copies eventually. Build the Main Body FirstMost of the structure is made from fine corrugated cardboard, the kind you get in express mail boxes, etc. The bridge patterns show what direction the "ripples" from the corrugated cardboard should be going when you draw your pattern. Be careful to follow the directions and be precise - this can produce a very strong bridge that weighs very little.Careful attention to detail during this phase will go a long way toward creating a sturdy, authentic-looking bridge. Main Body - You will need to make this part first, Consider making a template or stencil pattern for transferring the pattern to the sides. But before you start transferring the pattern, figure out the width of the rectangle that will connect the two sides (the length will be 18"). It will be easier to draw the rectangle first, then align the template for the sides against that.
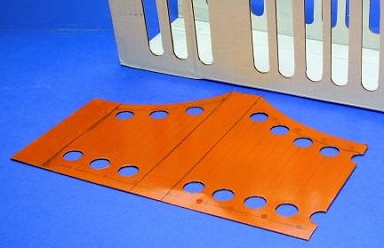
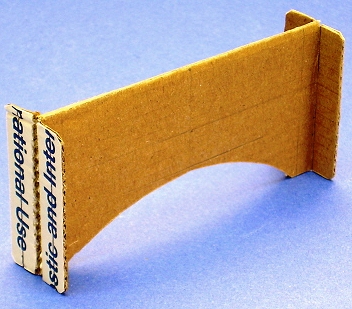
To help protect the To achieve the vertical art deco "beam" effect on the sides of the bridge, use the 1/2" hole punch to make the round part of the cut, then connect the 1/2" holes with vertical cuts using the knife and straightedge (not shown). Get out a piece of track and the 1" strips of wood to double-check the width of the bottom "rectangle." Remember to leave 1/8" extra clearance. When you are sure you have measured correctly, score the outside (bottom) where the fold will be and carefully fold the sides up. After the sides are folded up, get out the track and 1" strips and check again. This time, you can have a reasonably snug fit, as long as the wood strips and track don't put any outward pressure on the sides. Assemble a Cross-Tie and Check Clearance - Transfer the pattern for one cross tie, being careful to align the pattern against the corrugation "ripples" as shown on the pattern. Score the fold lines, then cut the pattern out. Fold and assemble it as shown in the photo below left. (You can use paperclips to hold it together temporarily.) Then, using paperclips, check the clearance of the biggest train you plan to use, using the highest-profile track you plan to use.
As examples, the cross-tie plan supplied should work fine for:
If, however you have a larger train and/or your track sits higher, you may need to adjust the arch in the cross-tie. As an example, a Lionel Polar Express train running on the supplied Lionel FasTrack(r), may need up to an inch more clearance than my trains do. A true O scale train will need even more. It's a lot easier to adjust this before you have everything assembled and painted. Apply the Trim - Cut strips of 3/16" cardboard and apply to the ends and tops of the sides. This is easier to do before you glue the main piece into its final shape. I cut separate pieces for the flat "peaks" and glued them on after gluing on the pieces over the arches. This provides a more finished look. Glue One Side of Cross-Ties Testing the fit again, glue one side of the cross-ties into place. Don't glue the other side just yet -it's easier to paint the bridge before the main part is in its final configuration. Prime the Interior - As I was building, I actually primed the main part in stages, starting with the interior surfaces, which are easier to paint before the whole thing goes together. Before I primed, I used blue masking tape to cover areas that I would need to apply glue to later - otherwise, I'd be gluing paint to paint, not cardboard to paper or whatever. Prime in several light coats a few minutes apart, rather than trying to get complete coverage in one coat.
Transfer the Rest of the PatternsBase - The base should be layered of at least two layers of fine corrugated cardboard. Each layer should be cut out of one piece. After you've transferred the pattern for one end, using a straightedge to make certain you are "lined up," flip the pattern around and transfer the pattern for the other end. Towers - I made the towers and their caps from thick, solid cardboard, the kind you get from the back of a writing tablet. If you use fine corrugated cardboard for these, align the pattern so that the "ripples" go the direction shown (lengthwise). You will need to make four of the tall towers and four of the shorter towers. Piers (optional) - The exact height of your piers may depend on what, if anything you want the bridge to cross. For example, if your bridge is only crossing a "painted on" river, you won't need any piers at all. My piers were made to accommodate the thickness of the foam insulation I used to represent a snow bank in the title photo. But I didn't attach them - this way I can use the bridge on a totally flat surface, too, if required. Edge Trim - Not shown on the plans are the 3/16-in. wide cardboard bands that cover all of the edges, tops, and ends of the main section. These should be cut from solid cardboard such as posterboard. Build the Base After you've cut out the base pieces and laminated them, wrap them from the top with acid-free bond paper. Make certain that every inch of the surface is glued down so no bubbles form later. This "smooths out" the edges and gives a smooth surface for the primer and subsequent coats of paint. After you've cut out the base pieces and laminated them, wrap them from the top with acid-free bond paper. Make certain that every inch of the surface is glued down so no bubbles form later. This "smooths out" the edges and gives a smooth surface for the primer and subsequent coats of paint.
The photo to the right shows the bottom of the base before I primed it. You can see how I slit and wrapped the corners. Attach the base. Attach the 1" wood strips - Remove the masking tape from the inside bottom and attach the wood strips. If you do this before the cross-ties are completely installed, you can use a staplegun like I did to staple right through the base into the wood strips for extra holding power. Attach the Cross-Ties
Paint the BridgeOnce you have the main part of the bridge attached to the base, prime the parts you haven't primed yet, and allow the paint to dry. I would prime the bottom as well as the rest of the bridge.Then, using your finish coat (I used Aluminum), put two or more light coats of paint on the entire bridge. Do not remove the remaining masking tape until the bridge is thoroughly painted and the paint is thoroughly dry (usually overnight). Assemble the TowersScore the fold lines on the towers before you cut them out.
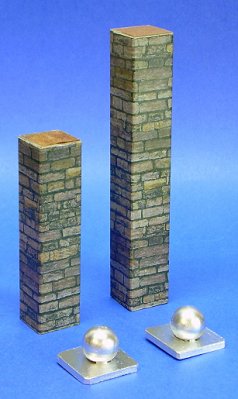
Vertical Tower Pieces - Fold each tower piece, glue it, and let it dry. Rubber bands can be helpful at this stage. To help keep each tower square and give more gluing surface for subsequent pieces, I cut cardboard squares that would just fit inside each end of the towers and glued them in place as well.
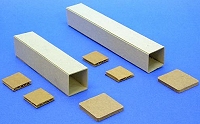
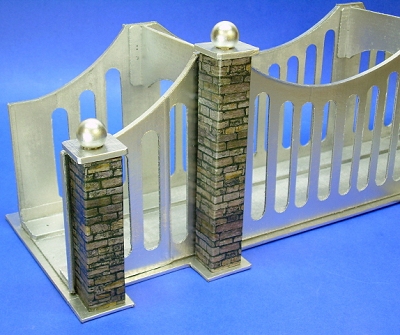
The white edges of the paper may show. With an appropriate color felt-tip pen, marker, or acrylic paint and a very tiny brush, carefully coat just the edge of paper and touch up as needed Caps and Finials - Make each cap piece by layering four layers of thick non-corrugated cardboard, like you get from the back of a writing table. Glue the pieces of each cap together, I made my finials (round top pieces) from 3/4"-diameter wooden craft store knobs, with 3/16"- mounting holes. I glued short dowels into each finial, then drilled a 1/8" hole in the center of each cap to stick them in. When all of the glue is dry on the finials and caps, paint them the color of your choice. Assemble the finials on the towers and glue them together. The photo to the right shows two of the towers set up against the bridge side to check the "fit." When you are satisfied with the fit, remove the remaining masking tape and glue the towers in place. Assemble the Piers (Optional)If you want to use the bridge to cross an actual dip in the terrain (like it does in my title photo), figure out how "deep" (tall) the piers need to be and adjust the plan accordingly. Assemble the boxes like you did for the towers, although the stone or block pattern runs lengthwise, as shown in the photos below.
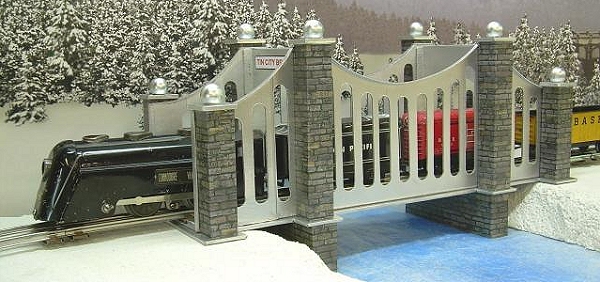
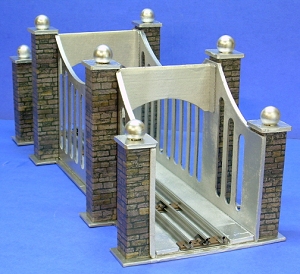
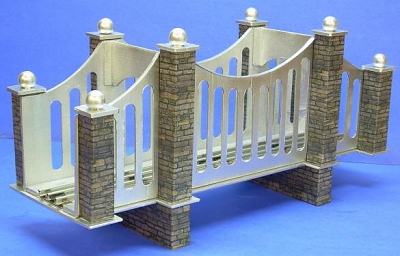
The following photos show the bridge without and with piers.
ConclusionTo finish this project, apply two or more light coats of a clear satin indoor-outdoor acrylic spray. You want to get thorough coverage without any drips. This will help protect the bridge from dust, moisture, fading, and fingerprints or stains. Also, if you have a project idea that you would like us to consider, please use let us know. Finally, now that I'm in "retirement," this hobby has become a sort of avocation for me. Several folks have commissioned me to build specific houses for them. So if you'd like me to "bid" on a project for you, or if you have any questions at all, please use the e-mail address on my order page to contact me directly.
If you liked this project, you may also like:
More Structure Projects for Indoor Trains and Towns include:
To Return to the BIG Indoor TrainsTM Primer Page, click here. |


|


 Building a Vintage "Lithograph" Station
 New
Feature - Building a Tinplate-Inspired Lamp Post
New
Feature - Building a Tinplate-Inspired Lamp Post New
Feature - Building a Tinplate-Inspired Watchman's Shanty
New
Feature - Building a Tinplate-Inspired Watchman's Shanty

|

|  |
 |
 |  |  |
Note: Big Indoor TrainsTM, Big Train StoreTM, Family Garden TrainsTM, Big Christmas TrainsTM, Garden Train StoreTM, and Trains and TownsTM are trademarks of Breakthrough Communications (www.btcomm.com). All information, data, text, and illustrations on this web site are Copyright (c) 1999, 2000, 2001, 2002, 2003, 2004, 2005, 2006, 2007, 2008, 2009 by Paul D. Race. Reuse or republication without prior written permission is specifically
forbidden.
Big Indoor Trains(tm) is a participant in the Amazon Services LLC Associates Program, an affiliate advertising program designed to provide a means for sites to earn advertising fees by advertising and linking to amazon.com.
For more information, contact us.
