 | |||
|
 |  |
 |  |
 |  | ||
 |  | ||
 |  | ||
| |||
|
|
| |
| |
| | ||
| | ||
| | ||
| Written by Paul D. Race for Big Indoor TrainsTM |
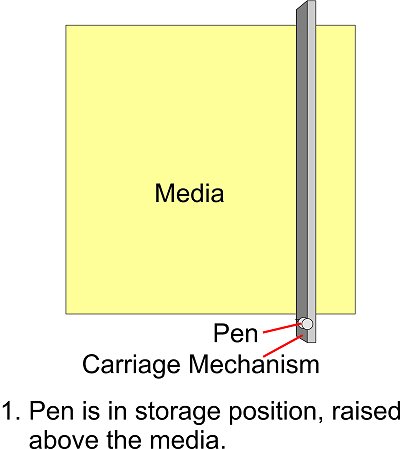
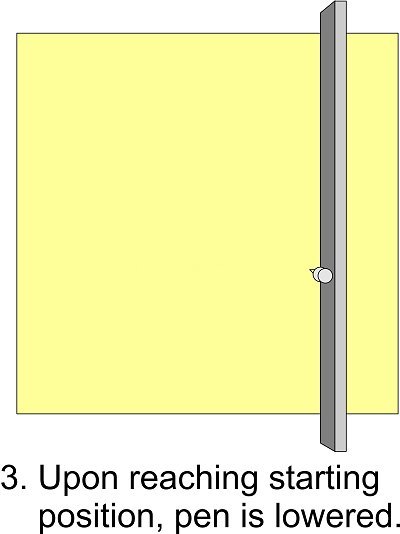
Introduction to CraftcuttersFirst of all, don't glance at this article, then rush out and buy a Cricut of any kind. If you already own an early model and you're fortunate enough to have an early version of Make-The-Cut or Sure Cuts-a-Lot software that works with it, guard that combination with your life - it's no longer available, and not likely to be available again in our lifetimes. And don't upgrade your firmware, whatever you do.If you have no idea what I'm talking about, that's okay, I just wanted to head off some confusion and disappointment. While the ProvoCraft Cricuts have put electronic craftcutters in countless homes, the ProvoCraft company has taken extreme measures to limit their usefulness to most hobbyists and designers. Second, you should know that the technology used by craftcutters is nothing new - it has simply been adapted for home use. Electronic craftcutters from ProvoCraft, Pazzles, Silhouette, and a host of others, are based on technology that sign-cutters by companies like Roland have been using for decades. Even those are based on earlier plotter technology. To folks unacquainted with those earlier devices, what craftcutters do may seem like magic. But there is no magic. There isn't even that much technology. ProvoCraft was clever when they adapted this technology into a single-piece device that users didn't have to understand to produce cutouts they could use to spice up their scrapbook pages or to make clever greeting cards or cupcake wraps. But there are a wide range of design and hobby uses that Cricuts don't work for at all. So if you're considering getting a craftcutter for your hobby or your design projects, you really should get an idea of how craftcutters work, what they're good at, and what they're useless for, before you lay out your shillings. A Craftcutter is NOT a Die CutterThis may seem like an unnecessary distinction, but for certain applications, you'll probably need to know the difference eventually, so we might as well spell it out now. A die-cutter uses a preformed pattern with sharp edges called a "die." The die is put into some kind of press to punch out the desired shape. These are used commercially to make greeting cards that are cut into unusual shapes, as well as so-called jig-saw puzzles and the cardboard letters you buy preformed to use on bulletin board. A few years back, if you bought a "die-cutting" machine to use for crafts or school bulletin boards, you were buying a press and a collection of blocks with sharp patterns on one side. You would put the blocks into the press to punch out letters or whatever patterns you bought. When ProvoCraft invented the Cricut, they wanted to take over the market that had previously been owned by craft-store die-cutters such as the Sizzix Big Shot and ProvoCraft's own Cuttlebug. True the Cricut can do 99% of what people use craft store die-cutters for, and a lot more besides. Crafters who upgraded from Cuttlebug to Cricut considered it a direct replacement. But it's not, technically, a die-cutter. In applications that demand precision, a die-cutter with a professionally-engineered die will still outperform a craftcutter. Sadly, since craftcutters became available, I've been introduced to a wide range of products that are advertised as "die cut," although they were produced on a craftcutter. For many craft purposes the difference is negligible, but there is a difference. And if you're working with something on a very small scale, the difference may be important. The real industrial analog to the craftcutter is not the die-cutter but plotter/signcutter technology, as you'll see in a few paragraphs. Thinking in Two DimensionsLong before ink jets or laser printers were developed, someone had the idea of making a device in which a single pen, controlled by a computer, would go back and forth across a piece of paper drawing lines. But if that's all the device did, at the end of your "job" all you'd have is one big line - a one-dimensional image as it were. How do you make the device draw in two dimensions? You make the paper go back and forth as well. To draw a square, for example, the machine would go through the following motions:
Graphics designers, mathematicians, and a host of others use the term X axis and Y axis to describe the movement that creates lines in each direction. If you grew up with an Etch-a-Sketch, you got used to controlling the X axis with one knob and the Y axis with the other. But on your Etch-a-Sketch, your "pen" moved in both directions and the media (the screen) stayed in the same place. Unlike the Etch-a-Sketch, a plotter or cutter moves the pen or blade along one axis and the media (paper, vinyl, etc.) along the other axis. (A few plotters and cutters have been made in which the pen/blade moves along both axes, but they are in the minority). Plotters (and Cutters) are Line-Driven Devices.How do you draw a diagonal using X and Y axes? Well, on the Etch-a-Sketch, you tried to move both knobs (X and Y) the same amount at the same time - not an easy task. On a plotter (or on a cutter, which we'll discuss presently), the pen/blade (X) and the media (Y) move at the same time. Fortunately, the plotter or cutter is hooked up to a computer that is a lot more precise than the average Etch-a-Sketch user's fingers. The computer calculates the precise direction - or vector that is necessary to draw the desired shape, then the "driver" software figures out how the combined movements of the pen/blade and the media will create that line on the media.Plotters are Better at Drawing Lines than "Filling In." - Remember how you filled in "dark" areas on your Etch-a-Sketch? You went back and forth about a hundred times with one knob while turning the other knob just a little so your lines would overlap. Now, occasionally, folks who use plotters will need to fill in a space, and the software does the same thing. But you have to agree that's a very inefficient use of a machine that will draw lines like a bat-out-of-you-know-where. When it comes to cutters, there's no point at all to "filling in." Lines - technically vectors - are all you need. Vector Graphic Software Designs the Lines - It's probably no surprise that the earliest and still the most popular use of plotters is to draw blueprints, product plans, and other things that are 99% lines. To create such patterns, you need software that excells at creating precise lines. Among its other uses, AutoCad is a "vector graphic" program. So are CorelDraw and Adobe Illustrator. These are in contrast with "paint" programs like Windows Paint, PhotoShop, or Paint Shop Pro that manipulate millions of tiny dots arrayed in a matrix called a "bitmap." Can you draw a diagonal line with a paint program? Yes, but when you zoom way in, you'll realize that the edge of that line is anything but straight. Both vector and bitmap graphic programs have their uses - I use both all the time. But they don't have the same uses. I can't use my vector graphic program to "clone out" beer cans from an otherwise stunning landscape photo. And I can't use my paint program to create the most precise graphics for plotters or cutters. (Yes there are "conversion programs" that will convert a simple bitmap to a vector graphic file for you, but it's more precise to start and stay with vectors if you can.)
|
 |
 |
 |
What happens when you stack them up? In the illustration below, the blue represents the clear windows.
 |
 |
 |
You can see that with added signage (which we provide as well - elsewhere), buildings built up from layers of signcutter vinyl could be effective.
Okay, you say, this is a lot of work to go through for one little building. But in this case, size is limited only by the width of the signcutter. What if you wanted to imitate the factories in the North Pole scenes of Polar Express? A whole town of factories? Once you'd designed the original graphics, you could make your buildings 24-36" high and as wide as you wanted, almost as easily as you could make the little building in our example. A small team of workers could create in days a "city" display that would take weeks to create any any other way.
If you're really picky about the appearance, you could cut a strip of plastic into "windowsills," add shutters, lighting, curtains, interiors, whatever you wanted. I guarantee that if you took any care at all with the finished product, not one visitor in a thousand would guess that it started out on a vinyl cutter.
Okay, here's the irony, sort of. As far as I can determine now from park records, the arboretum's sign department never did get around to making buildings this way. But the idea has stuck with me all these years, and hopefully you can see the possibilities. And maybe you'll check back so you can see our report on a similar project (to come).
You Have The Power (or Might Could Get It) - Back to the signcutter buildings - Why didn't I try this out myself when I first heard it? Well, at the time signcutters were prohibitively expensive for hobbyists. And my acquaintances with signcutters thought I was out of my mind when I tried to explain this to them. (So did most of my other friends, come to think of it.)
 Exit the Signcutters - By the way, many sign and print shops have started using large-format color laser printers for the kind of projects that signcutters used to handle. So don't read this article and assume that your friendly neighborhood sign shop will be able to help you if you walk in with a collection of vector graphic files. For that matter, even if they still have their signcutters, you'll still have some 'splainin' to do.
While I was researching this article, I did track down several signcutters that don't cost any more than some of the craftcutters we'll be talking about later. But most of the cheap ones still require proprietary software that is clunky and - in some cases - renders them less suitable for the kind of projects we're discussing than many craftcutters.
Okay, as a part-time graphic designer, I couldn't help wishing (for many reasons, not just this one) that I had access to a signcutter. But over a decade after I retired that idea for financial reasons, I saw electronic craftcutters becoming available for under $300. Except for the size of the media and the relative sturdiness of the machine, you should be able to do almost anything with a craftcutter you could do with a signcutter, given the right software drivers. 
Enter the Cricut (And the Cartridge Paradigm) - As you probably know by now, the first electronic craftcutter to find its way into many homes was the Cricut, followed by the Cricut Expressions, a similar product that could cut bigger media. The Cricut was designed to require "cartridges," something like the old Atari game cartridges (but much smaller) that you would plug into the machine. Each cartridge would typically have a typeface for writing messages and a collection of cutesy outlines that you could combine to make elaborate layered doodads for decorating scrapbooks or greeting cards. You would change the media to change colors, then layer the output, like the Clancy's example above.
Unfortunately, if you used that generation of Cricut the way they were designed, you could only cut outlines and typefaces that were on the cartridges you owned. If you saw another typeface or outline you wanted, and it was on a $30-$50 cartridge, you had to buy that cartridge, too.
To make it freestanding, the Cricut also had a built-in keyboard that you could use to type messages that would be cut out eventually. Some non-scrapbookers have figured out how to use this feature to make nice signs or similar projects. Still, you don't see keyboards on other cutters because they're redundant if you use a computer to drive your cutter.
Enter the Computer Geeks - To expert computer users, having to buy a $30-$50 cartridge every time you wanted to change fonts on the cutter seemed as silly as if you had to buy a new cartridge to go from Helvetica to Times Roman on your inkjet. So it was a matter of time before a number of companies figured out how to use the Cricut's USB connection to make it cut out shapes that weren't on the cartridge. The new programs essentially reduced the Cricut to a sort of  overpriced printer which could cut outlines using graphics and typefaces from nearly any source.
The most popular of the software packages was CraftEdge.com's "Sure Cuts-A-Lot." CraftEdge based the look and feel of their program on the look and feel of the Cricut itself, so it was pretty easy for experienced Cricut owners to figure out.
Frankly, that accommodation makes the interface seem a little awkward (especially since the software doesn't work with the Cricut any more - see below). But for me, those were secondary issues. To me, the most important feature of Sure Cuts-A-Lot, Make-the-Cut, and similar software was that I  could design my own graphics, then export them to a file format (.svg) that Sure Cuts-A-Lot or Make-the-Cut could import and use to drive the cutter.
I was on a budget, though, and I didn't get it right away. I also have serious time constraints, so when I did get around to buying a Cricut Expression and release 2 of Sure Cuts-A-Lot, it took me another year before I actually tried out the whole setup. It worked as advertised, pretty much, but by the time I had done enough experiments to start writing articles about it, everything had changed.
Cricut Closes the Door to Third-Party Outlines and Fonts - You've noticed that I used past tense a lot in the previous section. That's because there was a "reset" in 2011. Back at ProvoCraft's marketing division, they couldn't help noticing that scrapbooking fan sites were filling up with free downloadable .svg outlines. Cricut owners who had installed Sure Cuts-A-Lot or Make-the-Cut were downloading and cutting out thousands of outlines and fonts without buying more cartridges. This was bad news to people whose business plan depended on users paying $30-$50 a typeface.
So lawsuits happened. By the time the software companies had settled with ProvoCraft in court, it was apparent that Cricut would never again allow those particular floodgates to be reopened.
The software companies withdrew their current offerings and created new releases that would not support the Cricut. Every subsequent Cricut model has had firmware safeguards against this kind of "repurposing." I'm told that some "mandatory" upgrades to earlier models also add anti-"repurposing" software. So if you own a Cricut that once might have worked with the verboten software, it might not now. (That's why I cautioned you against firmware upgrades.)
Cricut also came out with software that was supposed to make designing your own graphics easier. In the last two years, their product line has diversified and their software has changed with it. In addition, the Cricut "Gypsy" now allows you to use downloadable typefaces that you buy from ProvoCraft. But you still can't incorporate outlines and typefaces that you didn't buy from them one way or another.
That's why I said earlier that if you have a Cricut and software that works with it to guard it with your life.
This is also why I say "Don't rush out and buy a Cricut if you want to cut your own designs."
Also, don't rush to the Internet and download the "fully working" version of Sure Cuts-A-Lot 1 or 2 that many sites advertise, unless you want a working copy of the old demo that cuts a test pattern across anything you cut, plus an assortment of very determined viruses added by the bootleg sites.
Finally, don't get me wrong - ProvoCraft had every right to keep their products from being used by markets they weren't designed to support. They never promised their users that Cricuts would work with third-party software. And the revenue from cartridge sales has allowed them to continue making new products that delight their target market.
But my core needs - cutting my original designs - remove me from ProvoCraft's target market, so I'll have to look elsewhere for my next cutter.
A modeler, designer, or putz house builder who wants to get the minimum use out of any computer/craftcutter setup will need:
About Vector Graphic Software - If you want to get maximum use, consider acquiring a vector graphic software package that exports files your cutter software program can read. For example, Sure Cuts-A-Lot and several other programs read .svg files, a kind of vector graphic interchange format.
I use CorelDraw X.5 on my PC. It exports .svg files, but CorelDraw hasn't always supported them. So if you come across an older version you can afford, try to make certain that it's legal and that it's not too old. At the "shareware" end of the scale, I'm told that Inkscape and DrawPlus will both create nice vector graphic files that can be saved as "plain" .svg files (a format that most craftcutters and modern signcutters can read).
If you have an Apple, the best vector graphic software you can buy is probably Adobe Illustrator. Like CorelDraw, it's expensive and very powerful. Although I'm told that experienced Apple users can use Inkscape, I don't know how easy it is to install on an Apple. I also don't know if there's a second choice that will work for most people, so if you're an Apple user with answers, let me know what you know, and I'll post the information here.
About Bitmap Graphic Software - If you are a whiz with a paint program, you can get some use out of it with most craftcutter software. Just be sure your output is either lines ONLY or a silhouette. Most craftcutter software will "import" such a graphic, usually asking whether you want to follow the centerline on lines. Answer that question "yes." Otherwise it will try to treat the line as a solid object and cut out the edges of it - a useless complication for most purposes.
Simple graphics like the building outlines shown above will generally convert well, as long as you start out with a fairly large graphic. If you try to convert a small bitmap graphic and then make it larger in your craftcutter software, you may discover weird artifacts as a result of the dots-to-line conversion process.
About Craftcutter Software - As mentioned before, no craftcutter software package now supports Cricuts. But most of them support almost everything else. A CraftEdge rep recently told me that when Cricut "locked down" their system, the software developers were just as happy to support the "open systems" out there. And the other cutter manufacturers went out of their way to make certain CraftEdge developers had everything they needed to support their machines. In fact, the CraftEdge site now includes several "bundles," through which you get a price break if you buy Sure-Cuts-A-Lot or eCal with a compatible craftcutter.
Some of the For example, CraftEdge now makes versions of Sure-Cuts-A-Lot that work great on:
The Sizzix EclipsTM, require special versions of the software called eCAL - so be sure you're buying the version you need. Fortunately, CraftEdge.com allows you to download a demo. The demo will cut a test pattern through whatever you cut with it. But you can use the demo to prove that the software will talk to your cutter before you lay out hard cash, er, plastic.
Make-The-Cut also has a long list of supported cutters. I won't get involved in a Chevy-or-Ford argument between those two sofware packages, only to say that each has its fans.
There are other manufacturers; in addition, many cutters have their own software - if you're already using vector graphic software to create your graphics, that plus the bundled software may do most of what you need for now.
When choosing craftcutter software:
About Cutters - As you can see by the list above and on the web site, since Cricut abandoned the designer and hobbyist market, quite a few other craftcutters have become available. A few of the "new brands" seem to be cheap Chinese imitations, so pay attention to reviews before you lay out real money. In addition, a couple signcutter companies have come out with entry-level models that will appeal to hobbyists, crafters, and designers.
By the way, HPGL is the name of the "language" that computers use to communicate with Hewlett-Packard plotters. So that's not a bad thing if you see it in the product listing - it means that they're making an effort to be as "open" as possible.
If you're looking for specific recommendations, you won't get them from me, at least until I've had my hands on most of them. Sorry.
I actually borrowed one and tried it out. It was a little cumbersome, but it did work. It didn't buy me anything, since I already had a working system - an old Cricut with the pre-lawsuit Sure-Cuts-a-Lot software. And, frankly, I was afraid that having the new software on my system would allow the Cricut "mattress police" to detect my old, pre-lawsuit Cricut and "update" its firmware, which would make it useless for my purposes.
That said, if you've picked up a Cricut Explore for any reason, it WILL allow you to import files from other sources, finally.
Brother has also introduced their own version - Brother ScanNCutTM. A feature some folks might find useful is the ability to scan images into its memory, then cut them out. I would expect it to be reasonably reliable. However, it doesn't plug into your computer. If you want to print something you designed on your computer, you design your images, convert them into the file format the Brother uses, and put them on a thumb drive. This is still better than a cartridge-driven approach, and it saves Brother from having to support thirty different operating systems or whatever. So if the ability to scan in designs seems helpful to you, this is another solution that works. Personally, I'd rather have my craftcutter set up to work from my PC like my printers do, but I'm a graphics software geek, what can I say?
Whatever you buy, make certain that it is compatible with whatever software you plan to use and vice versa.
Also if you plan on working it hard (say, cutting a lot of posterboard or the like), look for a cutter designed to take that sort of abuse on a regular basis.
 Cutting windowframes and other detail parts for model buildings
 Cutting stencils you can use for crafts - in fact, the building outlines above started out as stencils to be used in the reverse order shown to create very inexpensive scale "building fronts." Our article on that subject is here.
In addition, if you've been thinking about getting a cutter for your own or your club's purposes, I hope this helps you avoid any critical mistakes.
Watch this page: more articles are in the works.
As always, we want to hear your suggestions, criticisms, additions, etc. Enjoy your hobbies, and especially any time you can spend with your family in the coming months!
Paul

|

|  |
 |
 |  |  |
Note: Big Indoor Trains(tm), Big Train Store(tm) Family Garden Trains(tm), Big Christmas Trains(tm), and Garden Train Store(tm) are trademarks of Breakthrough Communications(tm) (www.btcomm.com). All information, data, text, and illustrations on this web site are Copyright (c) 1999, 2000, 2001, 2002, 2003, 2004, 2005, 2006, 2007, 2008, 2009, 2010, 2011, 2012, 2013 by Paul D. Race.
Reuse or republication without prior written permission is specifically
forbidden.
Big Indoor Trains(tm) is a participant in the Amazon Services LLC Associates Program, an affiliate advertising program designed to provide a means for sites to earn advertising fees by advertising and linking to amazon.com.
For more information, contact us.


 Back in the early 2000's, I was contacted by an arboretum that was setting up a Christmas-themed garden (outdoor) railroad for the first time. At the time they were planning to have their "sign shop" make the buildings.