bigindoortrains.com
https://bigindoortrains.com/forums/

Lionel 253 refurbish
https://bigindoortrains.com/forums/viewtopic.php?f=9&t=330
Page 1 of 1

Author:  winced36 [ Thu Jul 20, 2023 8:26 am ]
Post subject:  Lionel 253 refurbish

I've decided to proceed with giving the recently acquired Lionel 253 a refurbishment; this process, at least for me, falls somewhere between a clean/polish process and a full-on restoration. To be honest, most of my projects fall in the former and rarely in the latter (I don't think I've ever done what most would consider a full restoration), but occasionally the piece is so battered it needs some body repairs, some parts replaced/straightened, and a bit of new paint. After pondering this for a couple weeks, I think this is the best choice.

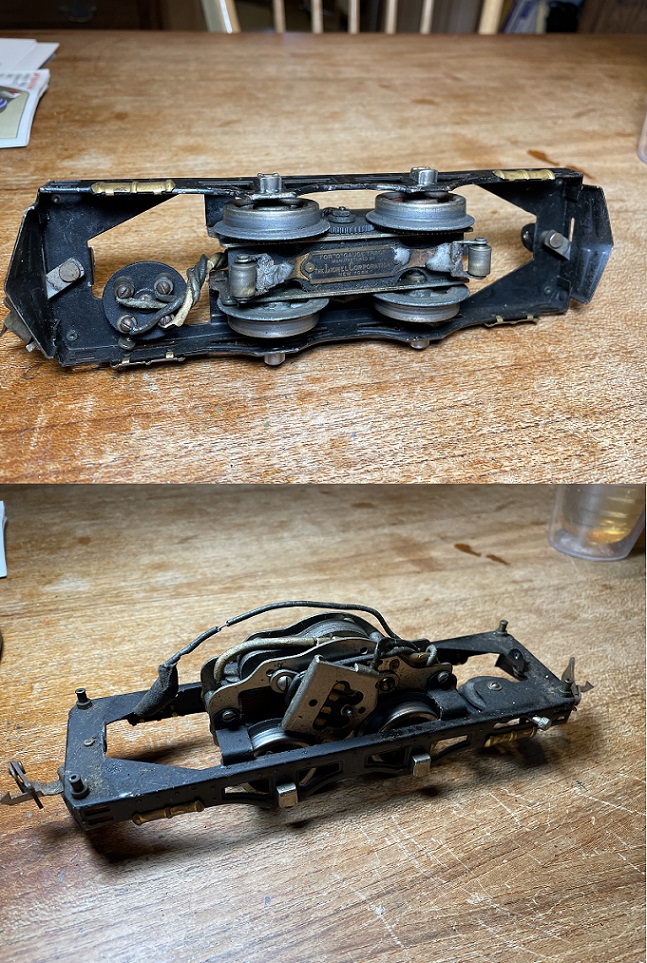
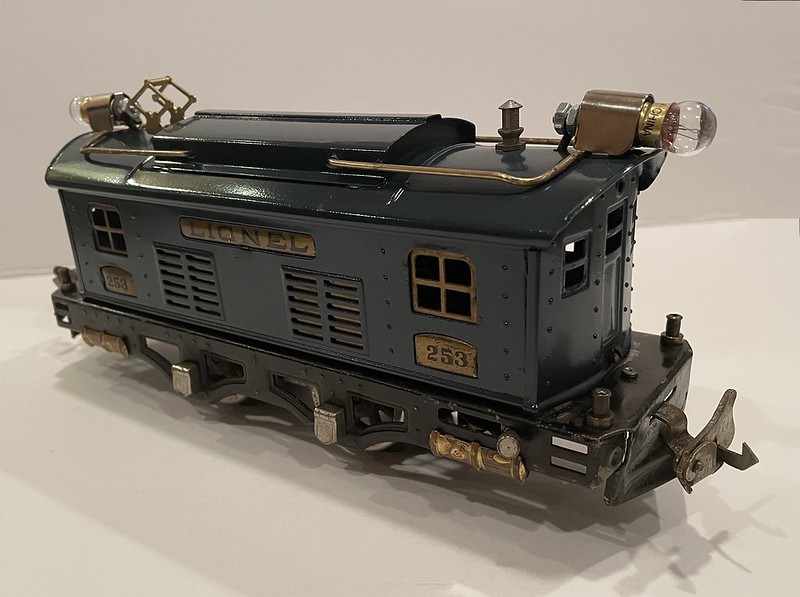
Here's a montage of the 253 as received:

Image

It doesn't look too bad in these photos, but a close examination reveals a number of problems.

The biggest is the broken tabs on the body's front and end pieces. They are held in place by four tabs, two on either side. The top two remain in place on both ends, but the bottom pair are broken off or damaged. Without the tabs, reattachment will likely require a judicious solder job. I say judicious because you can't blob it in there or it will interfere with reattaching the brass inserts. Fortunately I have a friend who is an excellent solder-man, so I might go to him for some help.

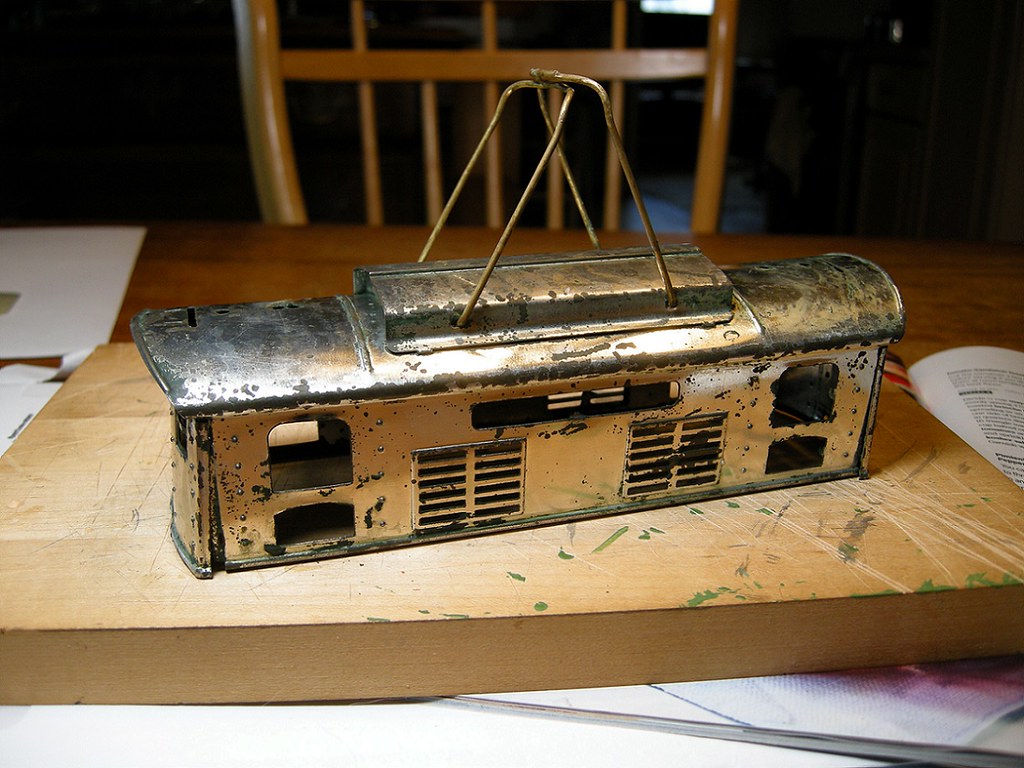
You can't solder on something that's painted. Sure, you can scrape away a bit of paint in the area you need to solder, but the heat of the solder will likely damage the remaining paint in the area (and on the opposite side). You have to make sure these things are well-painted for posterity, not to mention the beating they'll take over the next 100 years (should anyone have any interest in them). That, together with the multiple scrapes and chips, not to mention numerous dents and bends, makes stripping this body of paint necessary. You hate to get rid of original paint, but sometimes you have to.

But before you can do any of that, you gotta take all of the detail parts off, at least the ones that can be removed. In this case, I was able to get everything off except the two handrails at the top. Those seem firmly anchored and no amount of plier work seemed to get them bent to a point where they can be removed. You can't beat/work on them too much for fear of damaging the sheet-metal. It's not optimal, but I'm going to leave them in place and try to work around them.

Before I start the bodywork, however, I want to take a look at the motor and get it on the test-track. If it's shot, likely just a shelf-queen or a source of parts. Plus, I want to give the frame a careful examination, as I like to leave them as is, just a good clean and polish.

More later...

Author:  winced36 [ Sat Jul 22, 2023 11:10 am ]
Post subject:  Re: Lionel 253 refurbish

Okay, the 253's body has been removed, stripped of trim (except the handrails), then overnight in a bucket of diluted dishwashing soap. Usually this will remove all or most of the paint, but it doesn't seem to be working in this case. I'll leave it in there for another day or two, but probably going to turn to a purpose-made chemical stripper.

In the meantime, I inspected the chassis and motor, and all looks relatively good. This may have been rewired at some point, as the wiring looks like it has plastic-type insulation on it. I would have thought that, given its age, the wiring insulation might have been cloth. Regardless, the wiring now has some cracks in the insulation and should really be replaced. I might opt to rewrap it with some shrink-type plastic insulation I have here (somewhere)...undecided.

The good news is that when I put it on the test track, it ran nicely (even with cracked wiring and pick-up rollers in tough condition). It has a manual forward-reverse, and that worked fine as well. I gave the internals, especially the commutator, a shot from my stash of Radio Shack Control/Contact Cleaner & Lubricant. Some folks say you shouldn't use the stuff, but I've had good luck with it.

Image

The frame looks to be in good shape, so just a thorough cleaning and polish called for there.

Back to the body-work next.

Author:  winced36 [ Sat Jul 29, 2023 4:03 pm ]
Post subject:  Re: Lionel 253 refurbish

If you're a purist, look away; otherwise, here's the stripped cab of the Lionel 253:

Image

Still a bit more smudges of paint to remove, but not much. Most of the dark blotches are tarnish on the tin plating. I gotta make sure all of the paint's gone in the areas to be soldered (where the tabs are broken on the cab ends). I got most of the worst bends and dents straightened up. Last step before solder is a thorough wash using some strong soap.

Author:  winced36 [ Sat Aug 05, 2023 8:32 am ]
Post subject:  Re: Lionel 253 refurbish

With a good friend's help, we got the 253's body soldered back together. Five of the eight tabs holding the end pieces in place had broken off, so some judicious soldering using a resistance iron did the trick. No way I could have done this so neatly without burning a hole in the sheet-metal, so sincere thanks for the help:

Image

A bit more bending/straightening was required to get it to fit back onto the frame, and it's a tight fit, so some concern that the stress might pop the solder...we'll see. It'll get some rough handling during the next step (a final cleaning to remove the last bits of paint, then a thorough wash to remove absolutely every trace of chemical stripper) so a good test of the repairs. Presuming everything holds, it'll be off to the paint booth.

Ordered all of the trim parts needed from Joe Mania (JLM Trains), so those should be here in a few days. Also ordered most of the stuff required to refurbish the 252 that was in the same box. This includes a new wheel-set, a job I've never done before; looking forward to that.

Author:  winced36 [ Mon Sep 04, 2023 9:03 am ]
Post subject:  Re: Lionel 253 refurbish

Okay, getting back to this. It's been a few weeks and the solder joints show no sign of coming apart, so the next step is to polish off the last few smudges of original paint. I tried using a wire-brush wheel on the Dremel, but that didn't take it off, so I think some judicious use of stripper and some steel wool should remove the last of it. After that, a good bath in soapy water to remove any residual stripper. There are a few minor dings in the sheet-metal, but I think I'll leave those alone. One tends to make it worse if you're not extremely careful trying to straighten old bodywork.

I also need to clean and polish the frame. I'm not going to repaint any of that, just leave it original. It's in decent shape, perhaps just a few scratches and a bit of tarnish on the brass bits.

I've re-inventoried the replacement trim parts and I'm confident I have everything. The original plates are a bit tarnished, but I suspect I'll leave those alone for fear of inadvertently removing the painted numbers and lettering.

New pictures later this week.

Author:  winced36 [ Sat Sep 09, 2023 10:34 am ]
Post subject:  Re: Lionel 253 refurbish

A first coat of Scalecoat applied to the 253...here it is sitting outside in the sun for a bit of curing:

Image

Color looks off in this photo...I'm hoping that's just the light. Still need to shoot the inside, plus a bit of touch-up. Then a few days curing, I think, before we can start reassembly.

Author:  winced36 [ Sat Sep 16, 2023 7:09 am ]
Post subject:  Re: Lionel 253 refurbish

The painting process is complete (four coats and some time baking in the sun). It's not perfect having a bit of crazing in the paint, but it's adequate. The color is very close to the original, but has a slight blue caste to the paint. Being more of a preservation project than an accurate restoration, it's close enough for my tastes.

I re-inventoried the parts and confirmed I have everything:

Image

The lamps and the pantograph are reproductions from JLM, the whistle and the plates are original. I have the original pantograph, but it is so bent up I decided to replace it. I don't think I could get it bent back into shape straight enough to look decent. I can always swap it out if I rework it later.

I was wondering about giving the plates a bit of a polish, but I'm concerned about the possibility of removing the black paint. I'll likely just wash them off, maybe lightly buff them, but otherwise leave them as is. Hopefully I can get them back in without breaking any tabs.

The real challenge, as I see it, will be fitting the new headlamps. These have tabs that go down through a pair of slots, which will then need to be bent over to hold them in place. The headlamp needs to fit over the handrail that should go down into a recess in the roof under the headlamp...if you don't get them down into the recess properly, they will cause the headlamp to pitch forward slightly when you mount them. Not a good look, so a bit of fiddling required. Then, of course, you need to do all of this without scratching the new paint. I figure if I'm going to break the solder joints, this is when I'll do it.

Headlamps first, then the plates, then the pantograph and whistle.

Author:  winced36 [ Thu Sep 21, 2023 6:31 pm ]
Post subject:  Re: Lionel 253 refurbish

Okay, I'm calling this done. With a friend's help, we got the brass plates inserted and the tabs back in place (surgical clamps/pliers proved very useful). The missing parts have been replaced with new, with most original parts retained. It runs well, despite the battered pick-up assembly. I suspect the light wiring will require a revisit, and I'm not real happy with the pitched-forward look of the headlamps (the result of ill-fitting handrails, common on many of these early examples).

Image

The coaches look a shambles in comparison, but no plans to "refurbish". Hopefully just a good clean/polish...maybe.

Author:  winced36 [ Mon Oct 02, 2023 6:01 pm ]
Post subject:  Re: Lionel 253 refurbish

I got an offline note from a reader asking why I did not take the handrails off before stripping the shell, making the repairs, and repainting. The answer is pretty simple...bending the brass rod they are made of is really difficult, and once you bend it, it's even tougher to get back into its original shape. They are basically bent into a hook on the inside, which would be really tough to bend into a right-angle for removal. It was far easier to just mask them when repainting (although that did create a few issues in the paint booth).

Page 1 of 1 All times are UTC - 5 hours
Powered by phpBB® Forum Software © phpBB Group
http://phpbb.com/