Talk about Train and Town Hobbies

Visit our Affiliated Pages:
Building temporary and permanent railroads with big model trains
Return to Family Garden Trains Home page
Visit Family Christmas Online
Big Christmas Trains: Directory of Large Scale and O Scale trains with holiday themes Free building projects for your vintage railroad or Christmas village. Visit Howard Lamey's own web page, LittleGlitterHouses.com

It is currently Sat Apr 27, 2024 5:30 am

Note: This site has just been moved to a new server with slightly different software. We've tried to make certain that nothing important has been lost, but if you notice any broken links or other issues, please let us know as soon as possible by using the contact page.


All times are UTC - 5 hours


Post new topic Reply to topic  [ 5 posts ] 
Author Message
PostPosted: Tue Mar 14, 2023 5:14 pm 
Offline

Joined: Sat Sep 06, 2014 7:05 am
Posts: 590
I had started an in-process description of this project in the wooden structure thread back in November, but never finished it when the site temporarily went to vapor. I thought I'd finish it, maybe moving it to the paper/cardboard forum. It's a composite of many materials, and I have since identified a number of issues I ran into along the way. So here it is, a bit of a repeat, but carried to the end with maybe a few more details left out earlier.

After I built the castle-tunnel project a couple years ago, I had an idea for a second version that would serve as a tree-stand for a small artificial Christmas tree. It too would have a tunnel running through it for an O-gauge train set, either mechanical or electric. So this past fall, I got the itch to give it a try. I took a few photos to document the process, so I thought I'd share those here. I made a few design mistakes along the way and I'll disclose those here in case anyone wants to take a crack at this. I tend to be a stream-of-consciousness style designer/builder, so that catches me up every once in awhile :lol:

The castle was built on a straight tunnel, but I knew the tree bit would have to be in the center to maximize the support. The best way to do that seemed to be to build the tunnel on a curve, than put the tree-stand support at the center. By doing this, I could keep the dimensions of the project to roughly twenty inches square. That would work well with the table I planned to use.

The first step was to build the base. I used similar components as before (1/4-inch plywood for the base, 1x6 pine for the "portals"), although this time the tunnel would be on a 13-1/2 inch radius (same as O-27 gauge), which was also the same radius as the Marklin clockwork track I have. I cut the tunnel portals 3-1/2 inches wide (a quarter-inch wider than those I used on the castle project) and 4-1/2 inches tall, slightly arched at the top. I then screwed the portals to both halves of the base, leaving me with something fairly rigid to work with. I had used a couple sections of O-27 track and a small freight car to come up with the dimensions. This was my first mistake along the way; the tunnel proved too narrow for a couple of my small locos and cars to pass through without rubbing against the interior walls. If I do this again, the tunnel dimensions will be enlarged a couple inches in width and maybe a half-inch in height (at least).

I used USPS corrugated to form the interior walls. I cut it so the corrugated "grain" ran vertically. This allowed me to easily bend the cardboard on a curve to form the walls:

Image

I couldn't figure out a way to make a tunnel ceiling easily, given the combination of the arch and the curve, so I left that off figuring the planned wood top would form a ceiling of sorts for the tunnel.

The next step was to make the tree-stand support. I cut a bunch of four-inch-by-four-inch pieces and glued them together in a stack. Once dry, I glued the stack to the base and added a couple woodscrews from the bottom. Once that was in place, I cut a top from a piece of scrap 3/4-inch birch plywood I had in the shop, than screwed that down on top of the block tower and the tunnel portals. I then drilled a one-inch hole down through the top into the tower about five or six inches deep. I tested the bottom section of the tree in the hole to make sure it fit and that it was not prone to tipping over. I then cut a second hole in the top to pass the cord through, then a notch in the base for the cord to exit (that was my second mistake...should have been on the back side of the "mountain", not the front):

Image

I let the whole thing dry for a couple days, then proceeded to scenery.


Last edited by winced36 on Tue Mar 14, 2023 7:51 pm, edited 3 times in total.

Top
 Profile  
 
PostPosted: Tue Mar 14, 2023 6:26 pm 
Offline

Joined: Sat Sep 06, 2014 7:05 am
Posts: 590
My method of adding "mountain" scenery is similar to that used by many model-railroaders; it's a process of cutting and adding partitions in the profile of the slope, then covering them with either plaster-soaked bits of paper towel or the old school process of papier-mâché. Lionel had a method using sheets of glue-soaked felt, but I've tried that and it's a terrible mess. Howard Lamey turned me on to the time-tested method of papier-mâché, and it gives a good, albeit somewhat fragile, result. It's not too tough for someone to poke a hole in it in a moment of over-exuberance. On the layout, I've used the plaster method, but here I want something fairly lightweight, so we'll be using papier-mâché.

I used more USPS corrugated for the partitions, as the stuff is thin, strong, and lightweight. It's just a matter of making them a uniform height, than cutting them in random patterns and gluing them in. It's a bit tedious, but once you get going, it goes pretty quick. I cut all of the slope bits first and glued those in place; than I cut a bunch of pieces for the top to give that some shape, not just a big flat plateau. I wanted to add a couple of small buildings on the inside part, so I cut some notches in the sloped partitions to accommodate those. Here's where that step ended up:

Image

Most would just go ahead and start covering it at this point, but I find that the partitions show through a bit too much for my taste if you do that. One way to mitigate that is to stuff the cavities between the partitions with balled up paper, but that is a mess and adds quite a bit of weight, especially if you can't pull it out afterwards because you don't have access from behind. I prefer to add a bit of webbing using small strips of paper. This is tedious too, but again, it goes quickly once you get your groove on, and it will help prevent some of the ridging that occurs otherwise. This is where you end up when this step is done:

Image

The last step before papering was to add the basic wall-structure of the two small buildings. I used a few scraps of framing matt board to cut out the pieces, including window and door openings. One I gave some crenulation at the top, perhaps a tribute to the castle project:

Image

Once those were in place, I was ready to paper.


Last edited by winced36 on Thu Sep 28, 2023 3:56 pm, edited 2 times in total.

Top
 Profile  
 
PostPosted: Tue Mar 14, 2023 6:54 pm 
Offline

Joined: Sat Sep 06, 2014 7:05 am
Posts: 590
My papier-mâché process is pretty straight-forward. It's basically the same one I used in high-school art class, only I've substituted diluted white glue for the old wheat paste we used back in the day. Also, instead of torn strips of newspaper, I use small pieces of torn paper grocery bags. First I tear up the bags into small two-inch-by-three-inch pieces, then I mix up my glue (one part glue to two parts water). It's super important to tear the bags up into pieces; don't cut them. You want that fine feathery edge when you start applying the paper; it gives you a nice edge to blend/mesh together as you layer the hillside.

I papered the center section first (the part with the two buildings between the tunnel portals), then the section across the back. Carefully butt the paper around the base, to the portals and building walls, then up and over the top edge bit. Put a little diluted glue on your fingers and go over any rough seams, add a few patches to thin spots as necessary, than leave it to dry for a few hours (best overnight). It looks like this as you're finishing the papering process, before it's dry:

Image

When it's dry, it will return to a light color (the paper bag material will be dark when wet). If you see any gaps or tears, you can carefully craft a patch and apply it using a bit of paper bag and some glue. Then you have to let that thoroughly dry. The next step is to detail your tunnel portals.

Tunnel portals came in all sorts of forms and materials. I like the look of cut-stone masonry, so for this, I've unashamedly stolen Howard's methods. I cut a bunch of approximately 1-1/2" x 7/8" pieces of thin corrugated, then fold them in half. I trim one end to match the contour of the abutting hillside, then glue them onto the portal in "L" shaped over-the-corner pieces. You want it rough and somewhat irregular in shape, but also in "courses" as best you can. Use your imagination. When done, I ended up with this:

Image

I let this dry thoroughly, then prepared for the fun part...painting.


Top
 Profile  
 
PostPosted: Tue Mar 14, 2023 7:33 pm 
Offline

Joined: Sat Sep 06, 2014 7:05 am
Posts: 590
Is this fun or what?

Okay, once absolutely dry, I was ready to paint. The painting process would be in two steps: (1) the overall mountain, then (2) the detailing of the buildings and the tunnel portals.

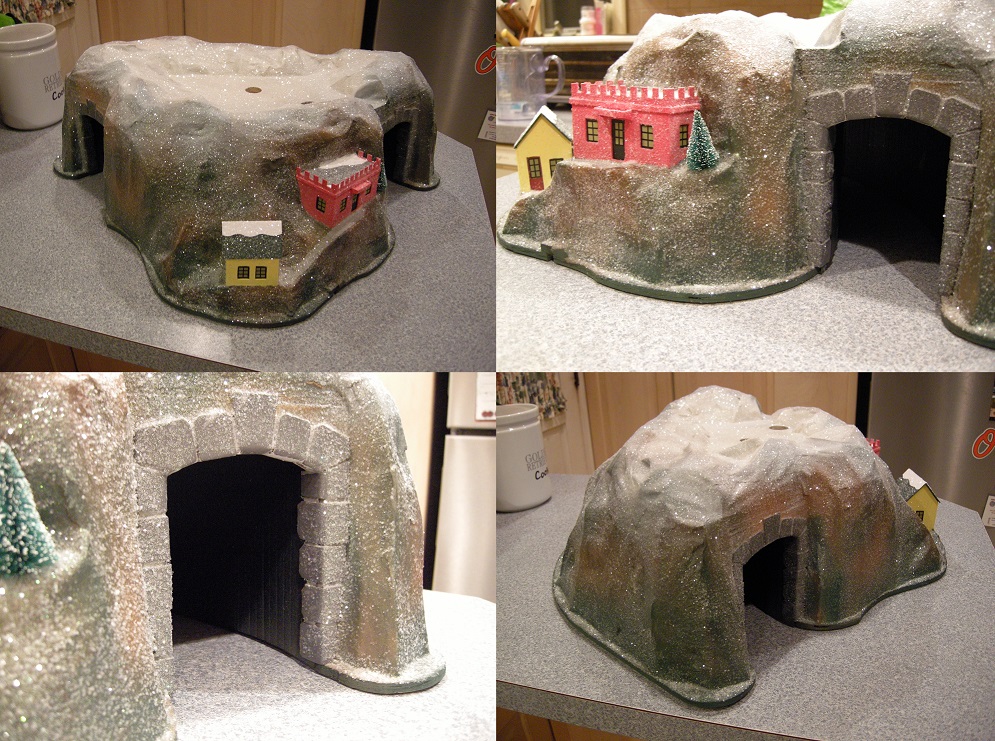
For the overall mountain, I used a few cans of flat or satin spray paint in green, tan, brown, gray, and white. I started with green around the base, than a mottling of green/brown/tan/gray going up the hillside. The top third of the slope and the entire top I sprayed white, trying to achieve a snow-capped mountain effect. There was some overspray on the building walls, but not much, and no worries as it's going to get hand-painted anyway. I gave the stone portal masonry a hand-painting using some gray acrylic craft paint I "borrowed" from the wife's stash. I left the joints between the blocks the lighter color for contrast:

Image

The last thing to do in this step was detail/paint the buildings. They looked a bit drab, so I tried to think of things to do to dress 'em up. The one with the crenulated roof line, I added a strip of basswood around the top to look like a cornice or a ledge. I then gave it a couple coats of some salmon-colored craft paint (same source), followed by a couple coats of yellow for the smaller peaked-roof house.

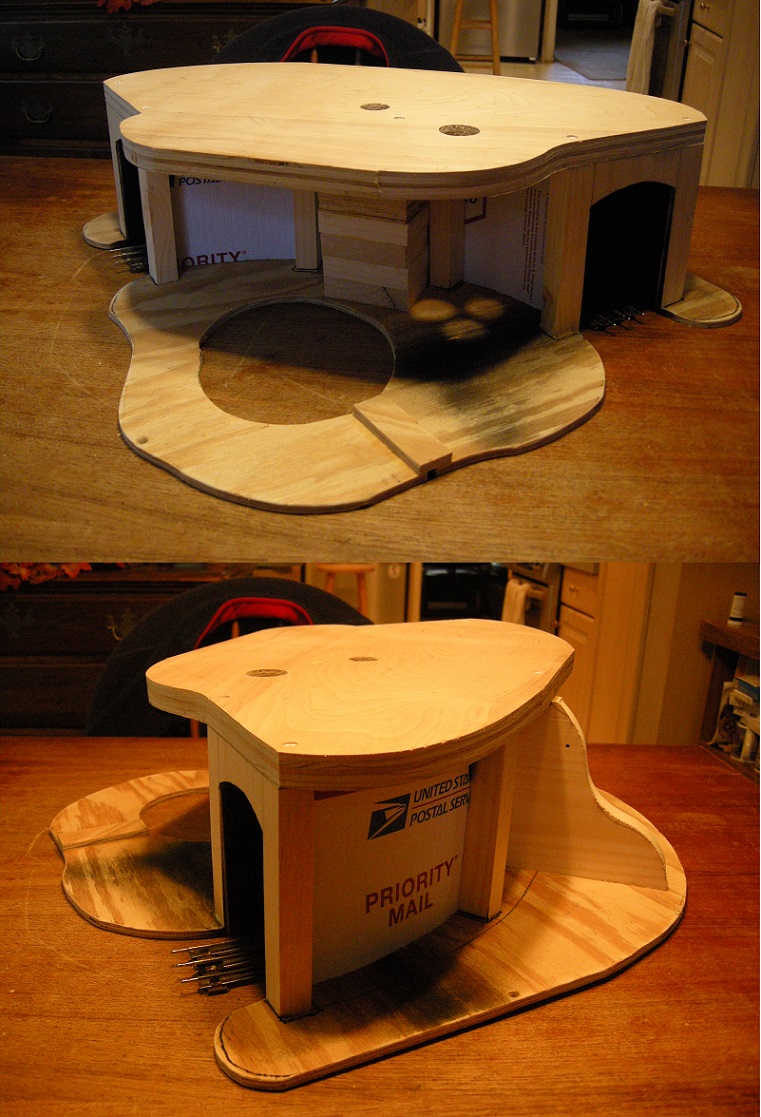
One of the neat things about the the prewar Lionel tunnels was that some included both interior lights and small buildings on the exterior. There was a hole in the felt or the sheet-metal that allowed s a bit of the interior light to shine through, illuminating the windows of the small buildings. It's a neat effect if you're lucky enough to have seen one. I attempted to replicate the effect here by leaving an opening behind each building and putting translucent vellum paper in the windows. The mistake I made was not leaving easy access to the interior for an interior light. A string of mini-lights/LEDs would work, with the battery box on the outside to turn on/off. But I digress.

I've made a window pattern in Excel that I use to print windows. I've tried a number of different sheet-plastics and papers for printing them, but vellum paper seems to work the best. It's printable, it's translucent, and it's reasonably durable. I printed a couple sets along with doors, cemented them in, than made a roof for each. Since this is a Christmas themed project, I added some "snow" effects.

The last thing to do was to slather the whole thing with glitter. With Howard's help, I've developed an understanding of how best to do this. First, go with a coarse grade of material, not the fine stuff. Second, make sure you use white glitter; some of the stuff sold had green or pink bits in it and it doesn't look great. A nice course, highly-reflective, white glitter seems to work best. I painted the entire tunnel structure with undiluted white glue, then sprinkled it liberally with glitter. After a few minutes, I dumped off the excess, then sprinkled it all back on again. This I left to dry for a few hours. Once dry, I dumped off any remaining excess, brushed it lightly with a brush to knock off any loose bits, then called it done:

Image

Fun project. Here it is in the village display:
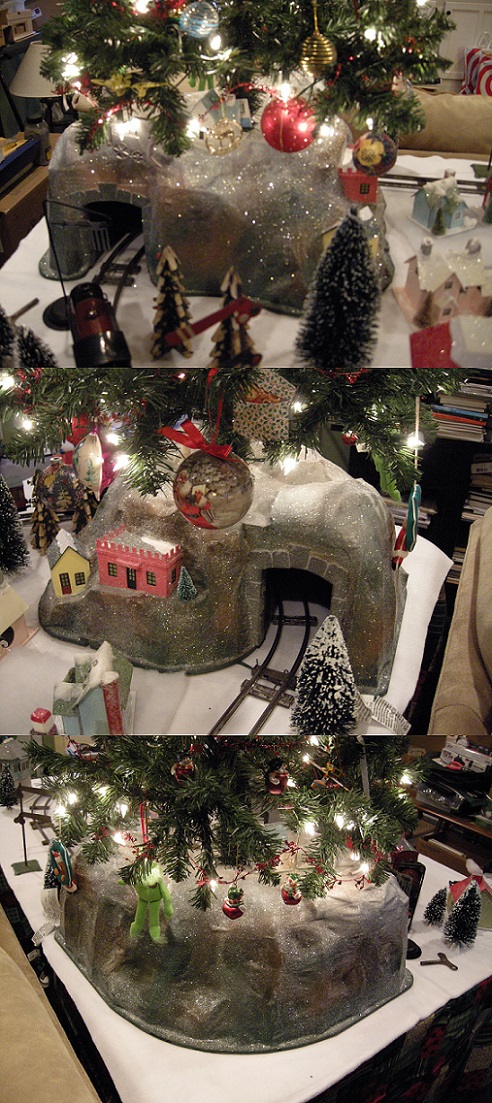
Image

Image

On to the next...


Top
 Profile  
 
PostPosted: Sun Jul 16, 2023 10:58 am 
Offline

Joined: Sat Sep 06, 2014 7:05 am
Posts: 590
I tried running my smallest electric set, a prewar American Flyer, through this thing and no dice, it's just too narrow (as some had warned). So now I'm looking at making another one...ugh!


Top
 Profile  
 
Display posts from previous:  Sort by  
Post new topic Reply to topic  [ 5 posts ] 

All times are UTC - 5 hours


Who is online

Users browsing this forum: No registered users and 63 guests


You cannot post new topics in this forum
You cannot reply to topics in this forum
You cannot edit your posts in this forum
You cannot delete your posts in this forum
You cannot post attachments in this forum

Search for:
Jump to:  
cron


Click to see sturdy Lionel(r) trains that are perfect for your Christmas tree.


Visit our affiliated sites:
- Trains and Hobbies -
Return to Big Indoor Trains Home page
Return to Family Garden Trains Home page
Big Indoor Trains Primer Articles: All about setting up and displaying indoor display trains and towns. Garden Railroading Primer Articles: All about getting a Garden Railroad up and running well
On30 and O Gauge trains to go with indoor display villages and railroads
Big Christmas Trains: Directory of Large Scale and O Scale trains with holiday themes
Visit Lionel Trains. Free building projects for your vintage railroad or Christmas village. Click to see Thomas Kinkaded-inspired Holiday Trains and Villages. Big Christmas Train Primer: Choosing and using model trains with holiday themes Visit Howard Lamey's glitterhouse gallery, with free project plans, graphics, and instructions. Click to see HO scale trains with your favorite team's colors.
- Family Activities and Crafts -
Click to see reviews of our favorite family-friendly Christmas movies. Free, Family-Friendly Christmas Stories Decorate your tree the old-fashioned way with these kid-friendly projects. Free plans and instructions for starting a hobby building vintage-style cardboard Christmas houses. Click to find free, family-friendly Christmas poems and - in some cases - their stories. Traditional Home-Made Ornaments
- Christmas Memories and Collectibles -
Visit the FamilyChristmasOnline site. Visit Howard Lamey's glitterhouse gallery, with free project plans, graphics, and instructions. Visit Papa Ted Althof's extensive history and collection of putz houses, the largest and most complete such resource on the Internet.. Click to return to the Old Christmas Tree Lights Table of Contents Page Craft and collectibles blog with local news of Croton NY.
Click to visit Fred's Noel-Kat store.
- Music -
Carols of many countries, including music, lyrics, and the story behind the songs Wax recordings from the early 1900s, mostly collected by George Nelson.  Download them all for a 'period' album.
Best-loved railroad songs and the stories behind them.
Heartland-inspired music, history, and acoustic instrument tips. Own a guitar, banjo, or mandolin?  Want to play an instrument?  Tips to save you money and time, and keep your instrument playable. Own a guitar, banjo, or mandolin?  Want to play an instrument?  Tips to save you money and time, and keep your instrument playable.
Powered by phpBB® Forum Software © phpBB Group