For the most part, I've finished off another paper building project, this the Parlor Flats Depot as presented in the November 1952 issue of Toy Trains magazine. Here's a blow-by-blow glimpse of the project.
Step one was to scan the pages from the original magazine. Everything is provided with the exception of a roof. For this, a rudimentary drawing was provided from which a roof could be made. After nearly 70 years, the magazine has a few blemishes, so I used MS Paint to clean them up as best I could. I also darkened the window openings, adding shades in random positions. I printed the scans on cardstock, then glued them onto matt-board, providing a good, rigid wall structure:

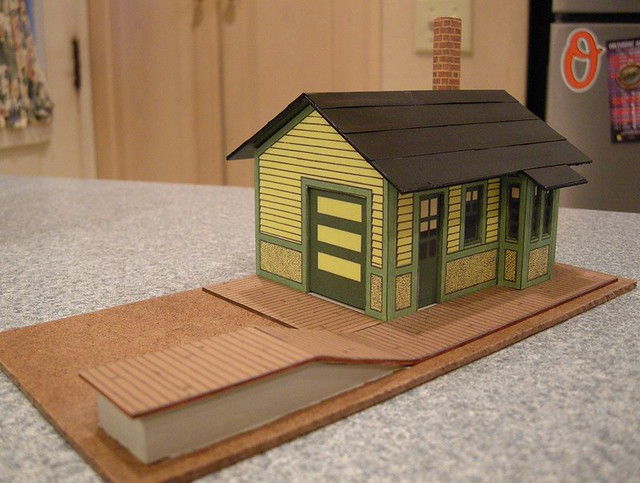
I next made a base from a scrap of masonite I had in the shop. The model as Hal Carstens designed it had no platform (which seemed a bit odd). I used a scan from a different model and, with the help of MS Paint, fashioned one for the depot. It needed to be "el" shaped to accommodate the track side as well as the end with the sliding door for freight storage. Being a western-style depot, the platform is ground-level, but I elevated one end to make unloading a boxcar a bit easier:

I built the "concrete" box and ramp for the elevated section and glued that in place first. Of course I didn't get the two sides of the ramp section exactly alike, so I had a bit of trouble getting things to fit properly (as seen in the photo above). A bit of shaving with an Exacto and an equal amount of fudging, I got something tolerable (certainly not perfect). Once that was done, I painted the matt-board edges of the platform bits and glued those down.
Next came assembly of the walls. First, I cut out all of the windows and doors, carefully painting the exposed matt-board edges a similar trim color. I then glued the printed windows and doors into position from the back side, providing just a bit of a three-dimensional effect. With this done, I then glued some balsa and/or basswood scraps onto the corners of two sides, along with a strip along the base on all four sides. This gave a good surface for gluing the sides together and to the base. I never use a square when assembling these sorts of things, but it wouldn't be a bad idea. You can get away with it with small projects like this, but larger walls/spans and you can get things out-of-whack pretty quickly. Here, the platform on two sides helped keep things square:

Okay, the next bit is rather tedious and quite fiddly. You'll notice that there are exposed edges on the corners where things butt together after assembly. This could be avoided if one built the inner structure first, then applied the exterior as a sort of wrap, going around the corners precisely and covering the exposed matt-board. I am, however, nowhere near skilled enough to make that work (the level of precision in cutting and assembling is substantial), so instead, I use another print of the components and simply cut out little paper corners that can be cemented in place to cover the exposed edges. Sometimes it's easy, but when you have lap-siding or lots of trim, making things line up can be a pain. It looks pretty good, however, when you get it right (or close to right):

Okay, proceeding nicely. Using the roof plan, I cut a roof from matt-board, scoring the ridge-line with a knife so it would fold to the correct pitch. I then painted the roof eaves with bands of black and green (matching the roof color and the depot's trim color). I also cemented four strips of basswood along the interior roof line on both ends of the depot, providing a surface to glue the roof to. With that done, I glued the roof on, clamping it with a few rubber bands going over the structure and under the base. When dry, I papered the roof with one-inch strips of paper, covering the peak with a narrow folded bit. I then painted the whole roof with some satin black paint I had left over from an earlier project. I was trying for a rolled-roofing look:
The chimney that was included in the magazine was usable, but seemed a bit short. Instead, I used a piece of 1/4-inch square basswood that I covered with a bit of brickpaper I printed using Evans Design's Brickyard software. If the first one was too short, this chimney could be considered unnecessarily tall. It also isn't quite straight either, lol, but whatever. A final detail was the installation of "cement" sills in each of the doorways.
Now, the local stations here, at least through the 1930s, had a signal for train orders. The signal was typically a three-position signal, indicating whether the train needed to stop at the depot, slow down to pick up train orders, or proceed at speed. I wanted to include one here, but in a style reminiscent of prewar toy train accessories (my layout is extensively prewar vintage equipment). I came up with a design based on prewar American Flyer signals I've seen, along with a JEP station signal I have a photo of. The mechanisms are very simple, consisting of a semaphore "blade", a tall post, a plinth for a base, a control rod, and a screw/nut/washer:

This was a bit of experimentation along the way. A couple of things: the brass screws seen here were discarded (too short), and the semaphore blade was too flimsy (cut from a sheet aluminum sign). I instead used a #4 1/2-inch round-head machine screw and nut, and I fashioned a sturdier semaphore blade from a strip of heavier aluminum cut from a door push plate I found for a couple of bucks at Lowes. The pole is a length of 1/4-inch round dowel, and the plinth was cut from a piece of 1-inch square trim.
The control rod proved the trick. I tried making one from some brass rod, but for one, what I had was too short, and second, bending a loop at the top and the "el" at the bottom proved difficult and gave uneven results. After thinking about it for awhile, I came up with the idea of using a bicycle spoke, cut to length. At one end was a 90-degree bend with a nub on it; this would work nicely at the blade end. All I had to do was then make another 90-degree bend at the opposite end to set the signal position. Three holes drilled in the pole at the right position and the control rod was in place. The last bit I discovered was that I needed a flat surface on the pole for the blade to sit against (otherwise the blade would flop around instead of staying perpendicular to the track). To provide this, I glued a steel washer at the top, through which the mounting hole for the blade was drilled.
Last thing to do was to paint it. I spray-painted the blade off-white and dark red (theoretically it should include a three-color lamp for night operation, but skipped that in an effort to keep it simple). Also, most train order signals had two blades opposite each other. That would require a somewhat more complex mechanism, so I passed over that as well. I painted the pole satin black and the plinth "concrete" (Howard Hues #1106). After all of that, here's where we ended up:

I painted the base with some gray acrylic craft paint I found in my wife's supply drawer. I may "pave" it with some Woodland Scenics medium-coarse gray ballast. This would hopefully come close to a match of the dark dray indoor-outdoor carpet I used to cover the layout benchwork. Or, I might just leave it painted. I want this thing to retain some toy-like appearance.
A friend of mine suggested a ball signal, which would be very cool. I made this signal removable, easily replaced with anything on a 1/4-inch pole. I ordered a couple of Grandt Line cable sheaves, have some brass tubing, plenty of basswood for the pole, just need to find a nice red bead to use for the ball (one that will fit down inside the tube).
One last thing...I changed the name of the project to honor a mate I lost halfway through. He lived in Pembroke, Georgia, helluva nice guy. He'll be missed.
Anyway, there you go. Let me know what you think.
