You Are Here.
Jump to other pages.
Use this project to add 'killer' charm to your Christmas village.  Click for bigger photo.Return to Big Indoor Trains(tm) primer pageOn30 Display Trains
O Scale Accessories
O Gauge Christmas TrainsOn30 Christmas Trains

Click to see exclusive, licensed Disney(r) train and village collections!

Written by Howard Lamey (with a little help from Paul Race)
for Big Indoor TrainsTM
Click to see Christmas Collectibles with railroad themes.


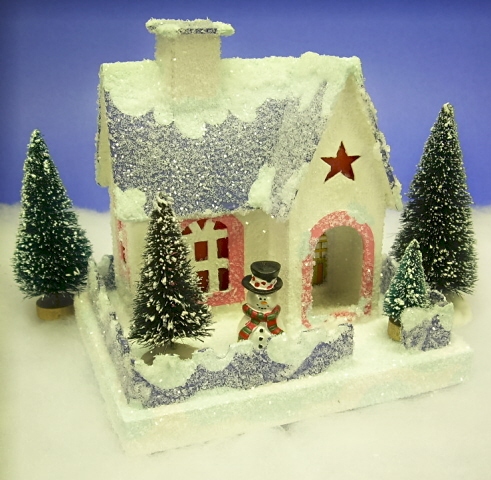
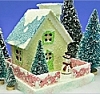
Note from Editor: This is a followup to our 2007 article on Building a Glitterhouse. We really do recommend that you start with that project, as this one is a little more complicated.

These projects come to us courtesy of Florida designer Howard Lamey. Howard loves collecting and designing replicas of those little cardboard houses that became popular Christmas decorations between World Wars. Collectors call the "putz" houses, from a German-American word related to "putter." Howard calls his creations "glitterhouses," because that's the specific kind of putz houses he likes the best.

Also, Howard often names his special project as he begins planning them, it helps him focus on what aspect he wants to emphasize. This one, the "Little Charmer," lives up to its name.

Building the Little Charmer

The Little Charmer is very similar to our starter project, except that we've added a wing and more internal bracing to strengthen the structure. If you've already built the starter project, or any of our other projects, you can probably skim parts of this article.

What You Will Need

Start by saving cereal boxes, the backs of writing tablets, anything flat, firm and clean. Please keep some corrogated cardboard on hand, too - it makes the best bases. In addition, for this project you'll need:

  • A sharp mat knife or Xacto knife (or both)
  • A stiff metal ruler
  • Elmer's white Glue-All. A glue stick would also come in handy.
  • Clear glitter. I use the “Sulyn” brand.
  • Several sheets of acid-free white bond paper
  • Flat white paint (flat latex interior wall paint is good) to prime the building (and give it the chalky feel of the original)
  • Acrylic paint in the colors you plan to use for the house.
  • Other accessories, such as bottle brush trees, that you plan to use to finish the house.

Note: Our article on What You Need to Build Glitterhouses lists many other materials and tools that will help you work more quickly and effectively.

Printing the Plans

Double-click on this image to see a higher resolution pattern. Double-click on this image to see a higher resolution pattern. Double-click on this image to see a higher resolution pattern.

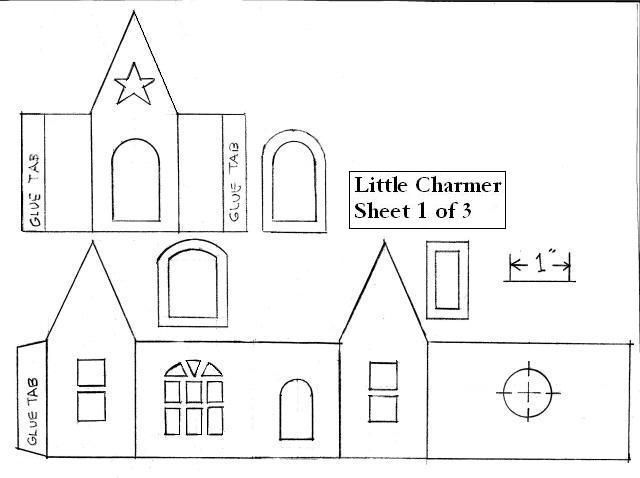
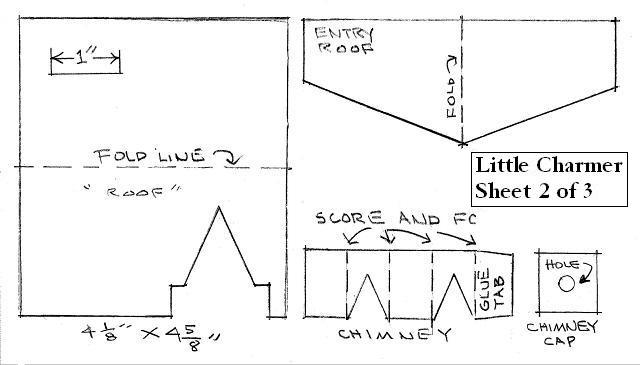
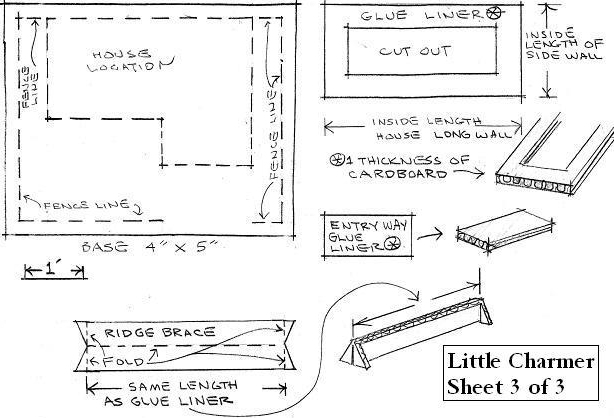
If you want to see the plans before you print them, you can see a bigger version by clicking on the graphics above. But the best way to print them is to click the following links to download the PDF versions:

Select the print option, tell it to "auto rotate and center" or whatever else you need to make it go to Landscape mode. Don't select the "scale to page" or "shrink to fit" option. Print.

If you don't have Adobe Acrobat Reader on your computer or for some reason that doesn't work, you can open the big JPG versions by clicking on the reduced plans above. Choose the "file, page setup" from your browser. When the page setup menu comes up, select "landscape mode." Choose the "scale to fit" option (sometimes "print as large as possible" or something like that. You may have to tweak the sizes a little to get them just right, though - that's why the PDF versions are more likely to work for you.

If neither of those work, contact Paul and ask him for help - that's his department. :-)

Building the Base

The base is a rectangular "box" that is decorated before the house and trees are installed. For this project, it should be about 4 1/4" square, and about 1/2" high. Click for bigger photo.

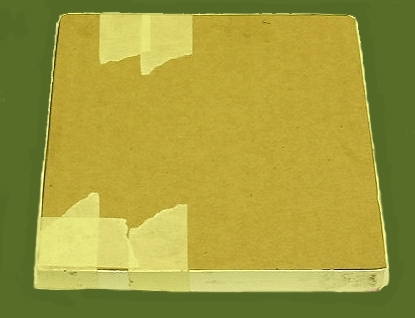
Cut the Base - For this project, I cut the base and fence pieces out at the same time. The base is made from heavy corrugated cardbard, the kind they use in big boxes. The fence pieces are made from fine corrugated stock, like that from the small express mail boxes you get at the post office. The same kind of fence can also be cut from heavy card stock such as posterboard or the back of a writing tablet. If you wish, you may use different materials for the fence, such as a miniature wooden snow fence from the craft store or a rustic rail fence you make from twigs.

Glue The Base - Build the base up from layers of corrugated cardboard glued together in a sandwich. You then wrap and glue a strip of thin poster-board or cereal-box cardboard all around it to smooth over the rough edges of the corrugated cardboard.

Click for bigger photo. Click for bigger photo.

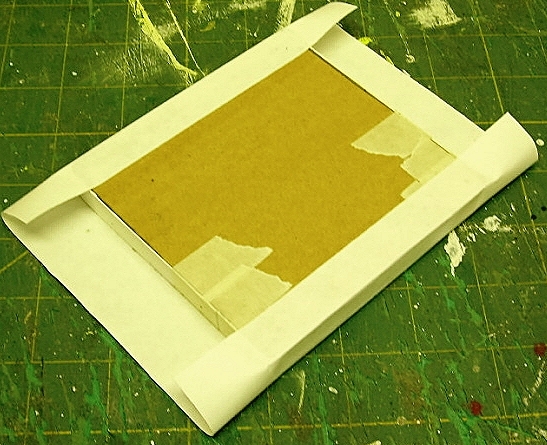
Wrap the Base - When the base is built and the glue is dry, you cover it with white bond paper just like you would wrap a gift, except that all surfaces of the paper cover must be completely glued down to the box. A glue stick works great for this.

The finish coat of paper is glued down everywhere so it becomes a part of the surface and recreates the pasteboard finish of the original glitterhouses. Click for bigger photo. Click for bigger photo

Note: More details about building bases are provided in our article: Building Glitterhouse Bases

Click for bigger photo.Attach the Fence - When the glue on the base has dried, glue the fence pieces to the base.

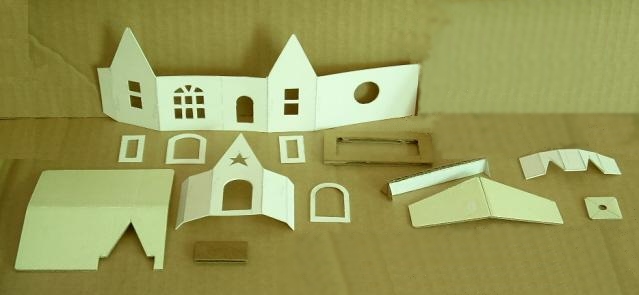
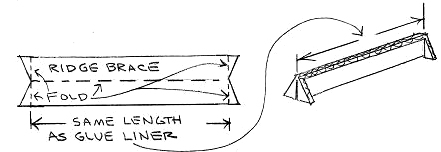
Prime the Base - When all the glue has dried, paint the base with the flat white paint. This provides an even finish that will hold the acrylic paint and glitter. If the fence is made of cardboard, prime it, too.

Selecting the Stock for the Structure Pieces

The house, roof, chimney, and chimney cap need to be cut from thicker cardboard, such as the cardboard from the back of a writing tablet. The door and window frames can be cut from thinner stock, such as posterboard or cereal box cardboard. The ridge brace and liner pieces can be cut from heavy corrugated cardboard stock.
Click for bigger photo

Cutting Out the Structure Pieces
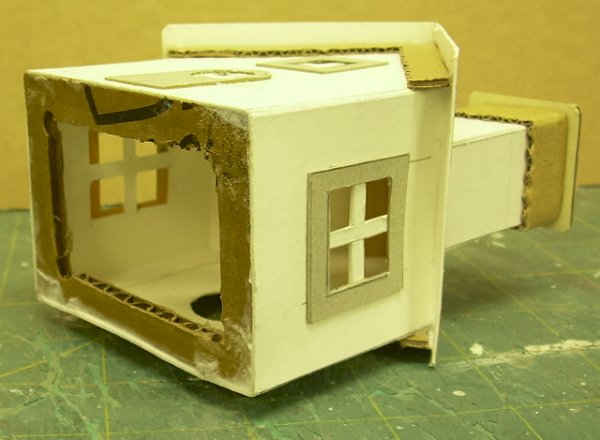
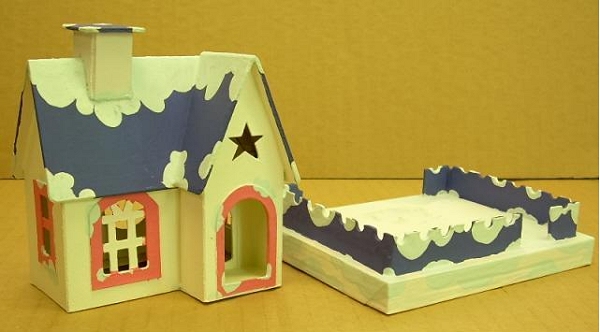
  1. Carefully transfer patterns of all pieces to the cardboard building stock. A .05 mm lead mechanical pencil and a “C-Through” brand ruler make this accurate and easy.

  2. Put new blades in the mat knife or X-acto knife (or both) that you will be using.

  3. Score the fold lines before you begin cutting out the parts (although you may score the roof pieces later, if you wish, after you've checked the overhang). Use the metal ruler or other steel edge as a guide.

  4. Still using a steel-edged ruler as a guide, cut out the shapes. Watch your fingers.

  5. Cut the door and window frames from the thinner cardboard.

  6. Click for bigger picture.The liner pieces are cut out of corrugated cardboard. There should be a "long" piece that just fits inside the main section of the house. It will be glued inside along the bottom edge to make the structure more rigid and to give more surface area for gluing the house to the base. The smaller piece will be glued inside the front edge of the "wing" (under the door).

    This sub-base made of corrugated cardboard provides a little more strength to the house and gives a better surface for gluing to the base.  Click for bigger photo.Using these pieces is optional, but may add years to the usefulness of the finished product.The photo at the right gives you a better idea of how the liner will look in place. Yes, it's from another project, but you get the idea.

  7. Cut the ridge brace from of corrugated cardboard or thick card stock, like the back of a writing pad. When it is folded and assembled, Click for bigger picture.it should be the length of the long part of the house and fit just inside the peak of the roof. It might be a good idea to temporarily fold the long part of the house walls together to test the fit and glue this piece before you start gluing anything else. Again, using this piece is optional, but may add years to the usefulness of the finished product.

Assembling and Painting the House

Note: You'll notice that there is some "hurry up and wait" involved with this portion of the project. That's one reason I often work on more than one building at a time.

  1. Using Elmer's white Glue-All or a similar product, assemble the house pieces.

    White glue works best if you apply a thin coat to each mating surface and wait a few moments for the glue to become tacky. Do not glue the house to the base yet.

  2. Glue the chimney and chimney cap together.

  3. Glue the liners and ridge braces in place.

  4. When the glue is dry and you feel that the structure is "sound," double-check the roof size. The most important thing is that it has an overhang on all sides just like a real house. After you determine where the peak of the roof should be, score the crease. Make any adjustments to the outside shape of the roof as necessary, and glue on the roof.

    Click for bigger photo.

  5. When the glue for the roof is dry, glue on the door and window frames.

  6. Prime the house, including trim, with flat white wall paint. Don’t skip this step; it gives you a uniform surface for painting.

  7. Paint the house in your choice of colors. I use acrylics from the Wal-Mart craft department. For anything that is painted gold, silver or bronze, I use “Testors” brand model paint.

    Note Howard's signature 'Dr. Seuss' color choices and white paint 'globs.'  Having exaggerated colors and patterns is important because the clear glitter actually tones things down a little.  Click for bigger photo.

  8. Paint the base and fence. A white base with random swirls and dabs of very light pastel blue and pink are a good choice. Paint the fence a color that ties in with the rest of the house but is dark enough to contrast with the base. I suggest you not use yellows, beiges or greens in the snow.

  9. Click for bigger photo.Add clear glitter to the house and the base. Brush on a thin, but even coat of undiluted white glue and sprinkle on the glitter. Don’t try to do the entire house or base at once. White glue starts to film-over and dry quickly so just do a wall or a section at a time. The glue dries clear so don’t judge the final look until the glue is dry.

  10. Glue the window covering material on the inside of the house. I use colored velum or colored “cellophane type” material. Red seems to be the traditional color but you can use any color you like.

  11. Glue the finished house to the finished base. Fill in any gaps between the house and the base with white glue and sprinkle on more glitter.

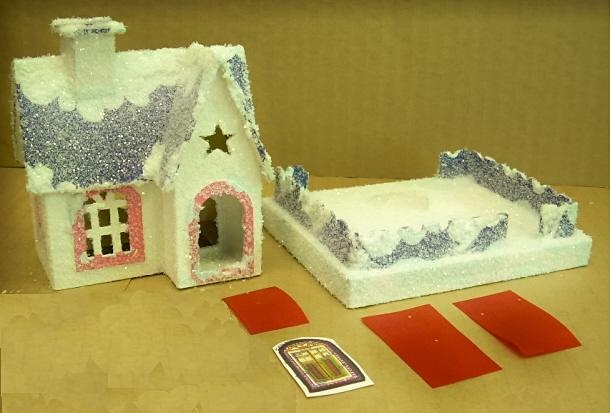
Adding Additional Scenery

For this structure, Howard chose a bottle brush and a small Christmas tree ornament shaped like a snow man. Click for bigger photo.Add yard accessories such as a small figurine and a bottle-brush tree.

I like to use miniature Christmas tree ornaments such as a Santa, deer and snowmen. You may even choose to make you own accessories.

[Editor's note: I have seen cheap party favors and cake decorations that were also suitable - it's okay if your accessories look a little "tacky." For trees, some folks cut apart a loofah sponge and dip it into deep blue-green paint, wring it out, and let it dry to simulate the lichen-like organic material used on some of the original houses. - Paul]

When everything is glued together and the glue has dried, touch up any place that the glitter hasn't covered evenly.

Conclusion

You can see that, when you get to the gluing, painting, and glittering stages, there's a lot of "hurry up and wait." That's one reason many people who build modern putz house recreations work on two or three houses at the same time - you can work on the second house while the glue is setting on the first one, and so on.

Reader Input

A very nice reader who didn't want her name used sent us the photo on the left below. Her "Little Charmer" project (click for a bigger photo) replaced the fence with extra shrubbery for an "overgrown garden" look. Thanks, bunches, for sending it in.

The photo to the right below is from "Life is a Party" blogger Dannyelle Nicholle. Dannyelle has made at least 22 glitterhouses, using Howard's plans and instructions, but her favorite is her "Little Charmer." Click on the photo to see the other photos on Dannyelle's blog.

Click for bigger photo. Click to see more photos of Dannyelle's glitterhouses.

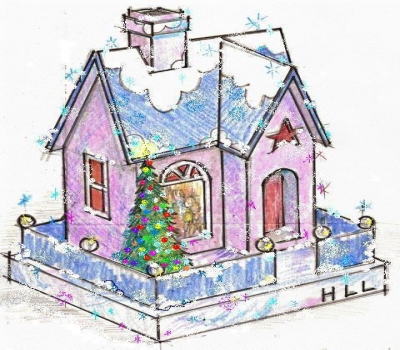
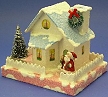
Commercial "Plug" - Now that I'm in "retirement," this hobby has become a sort of avocation for me. Several folks have commissioned me to build specific houses for them. The drawing at the right shows the concept I started with when a friend asked me to design a house with this pattern. Then the original "artist's conception" was tempered by adjustments to make the house fit in better with the other houses it would be joining, as well as color and accessory changes. But you can see that it all starts, quite literally, at the drawing board.

Click for bigger picture.Perhaps you had a pasteboard house collection when you were young and would like to have a replica made. Or you have an idea for somthing that's never been done. If you can find a photo or hash out a drawing or anything else to give me some idea of what you're looking for, that can be enough to get started.

If you'd like me to help you design and/or build a special vintage pasteboard house for you, or if you have any questions at all, please see my site, LittleGlitterHouses.com for more information.

Looking for Your Ideas, Projects, or Photos - Also, if you have similar project, ideas, or photos that you'd like to share with your fellow readers and hobbyists, we'd love to add them to our sites, and we'll be sure to give you full credit for your contribution.


Other Resources for Putz Houses and Related Information

  • Other Putz House Articles:
    • What is a Glitterhouse? - Our introduction to the hobbies of collecting and building glitterhouses.
    • Building Glitterhouse Bases
    • Click to see our beginning glitterhouse construction article.What You Need to Build Glitterhouses
    • Building a Glitterhouse - A detailed primer on starting your own glitterhouse hobby, including free downloadable plans and detailed instructions for making simple houses and churches.

    • Click to see detailed directions for building this vintage-style pasteboard house. Building a Picture Window House - Another new glitterhouse project. This one includes unique features such as a sand finish and picture window that reveals a "Christmas scene" Includes free downloadable plans and directions.

    • Building the Union Station - This original project by designer Howard Click to see free downloadable plans,  directions, and graphics for this vintage-style Christmas house.Lamey is inspired by two traditions - the cardboard Christmas houses that were popular in US homes between 1928 and 1965 and the Lionel station that was popular for most of the 20th century.

    • Click to see free downloadable plans,  directions, and graphics for this vintage-style Christmas house.Building a Bay Window House - Bay windows were popular in Europe for centuries; they were also popular in the mid-20th century in North America. This project will add a nice variety to your Christmas village.

    • Click for bigger photo
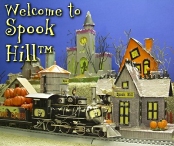
Welcome to Spook HillTM - Howard has designed a whole, family-friendly, Halloween community built in the vintage "putz-house" style. Includes many free downloadable plans, photos, and detailed instructions.

    Other Putz House Resources:

      Click to see Howard's site.

    • LittleGlitterHouses.com - Putz house builder Howard Lamey now has his own site, begun in December, 2007. You can get ideas for your own project, commission your own custom-built glitterhouse, or buy a precut kit and finish it yourself.

    • "Papa Ted's Place" Ted Althof's extensive resource about vintage pasteboard houses. Includes some history, many photos from other people's collections, and resources to help you build your own. The links below will take you right to the approprate page on "Papa" Ted's site. You'll find lots of other pages to look at while you're there, though.
      • Building from Scratch - "Papa" Ted Althof has collected tips and photos from other glitterhouse builders including Tom Hull and Ted Howard.
      • Repair and Restoration - "Papa" Ted Althof publishes Tom Hull's tips for restoring damaged antique glitterhouses.
      • Reproduction Parts - Ted offers authentic reproductions of just about every door and window that were used in glitterhouses over a 35-year period. These include celophane and paper "see-through" windows, as well as "stick-on" windows. If you don't know what sizes you need, you can order a template or sample pack. The page includes several photos showing how the replacement parts bring otherwise solid vintage glitterhouses "back to life."
      • Making "Flocked" Windows - Tom Hull's method for making "fuzzy" windowframes on celophane, with additional tips by author and glitterhouse collector Antoinette Stockenberg.
      • Repairing or Replacing Trees Tom's article about the "lufa" trees that were common on pre-war glitterhouses, and can be repaired or else replaced by new lufa carefully cut, soaked with dark green acrylic paint, and allowed to dry before gluing and applying white paint for "snow."

  • Other Articles that Discuss Putzes and Christmas Villages of the mid-20th Century:
    • About Nativities - Describes how German-American Nativity displays (the original "putzes") grew into communities and landscapes that included pasteboard "putz" houses and even electric trains.
    • What Do Trains Have to Do With Christmas - Describes how electric trains contributed to the communities many families set up at Christmas, with some details about the elaborate "Christmas Gardens" of the Baltimore/DC area.
    • Author Antoinette Stockenberg's home page - includes photographs and comments on putz houses and life in general.

    Return to Big Indoor Trains(tm) primer pageTo Return to the BIG Indoor Trains(tm) Primer Page, click here.

Click to sign up for the 'Trains-N-Towns<sup><small>TM</small></sup>' newsletter, with articles about display villages, indoor railroading, and much more


Click to see articles and resources for a joyful family Christmas.


Visit our BIG Train Store<sup><small>TM</small></sup> Buyer's Guide Pages


The Ultimate Disney Holiday Village: Collectible Christmas Decoration


Winnie The Pooh Collectible Hundred Acre Wood Miniature Christmas Village Collection


It's A Wonderful Life Village Collection


Home Pages
Reading Index Pages
Buyer's Guide Pages
Return to Big Indoor Trains Home page Return to Family Garden Trains Home page Big Indoor Trains Primer Articles: All about setting up and displaying indoor display trains and towns. Garden Railroading Primer Articles: All about getting a Garden Railroad up and running well Garden Train Store: Index to train, track, and other products for Garden RailroadingBig Christmas Trains: Directory of Large Scale and O Scale trains with holiday themes
On30 and O Gauge trains to go with indoor display villages and railroads


Visit any of the links below to see quality collectible Christmas gifts and
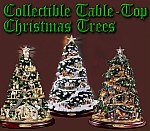
decorations that have been popular with our readers.

Click to see collectible table-top trees, including animated ceramic trees from Thomas Kinkade(r) and other world-class designers. Click to see collectible Christmas wreaths designed by world-known artists. Click to see classic nativity sets, including collections from world-known designers. Click to see collectible Christmas ornaments by world-known designers. Click to see Christmas collectibles with railroad themes - designs by Thomas Kinkade(r).

Note: Big Indoor TrainsTM, Big Train StoreTM, Family Garden TrainsTM, Big Christmas TrainsTM, Garden Train StoreTM, and Trains and TownsTM are trademarks of Breakthrough Communications (www.btcomm.com). Spook HillTM and LittleGlitterhouses.comTM are trademarks of Howard Lamey. All information, data, text, and illustrations on this web site are Copyright (c) 1999, 2000, 2001, 2002, 2003, 2004, 2005, 2006, 2007, 2008 by Paul D. Race. Reuse or republication without prior written permission is specifically forbidden.
Big Indoor Trains(tm) is a participant in the Amazon Services LLC Associates Program, an affiliate advertising program designed to provide a means for sites to earn advertising fees by advertising and linking to amazon.com.


For more information, contact us.

Click to see exclusive, licensed Disney(r) train and village collections!

Click to see exclusive, licensed train collections in your favorite NFL colors!

Special Offers - FREE gift!!